Tri State Area
Makerspace at the Fulton School
Shark Murals

Making a Slim Style Pen

I made a pen on the Lathe that took me about 5 hours.
First I got three pieces of wood, two of which were dark Walnut and one piece was Canary? The solid piece of Walnut was 6 cm by 1.5 cm by 1.5 cm. The two smaller pieces 3 cm by 1.5 cm by 1.5 cm. The two smaller pieces of wood were glued together using Cyanoacrylate Adhesive that took about 35 minutes to cure.
After that dried I drilled holes in the wood. I found the center of both the pieces of wood on the side that is 1.5 cm by 1.5 cm, by drawing two diagonal lines from corner to corner. Where the two lines met that was the center. Afterwords I took a pieces of wood to the drill press and drilled a hole that is 0.7 cm in diameter. Next, I glued a brass tube into both wood pieces and waited another 35 minutes for it to dry. When all the glue was dry I went back to the drill press once more and changed from the 0.7 cm drill bit to the Pen reamer. The Pen reamer does two jobs at once, first it clears out any glue in the brass tube, second it cuts down the block of wood down to the size of the brass tube that is 5.25 cm.
Finally after about an hour fifteen minutes I finally could put both blocks of wood on the mandrill and put the mandrill on the Lathe to shape the pen body. Once I screwed the mandrill on the Lathe I turned on the Lathe to the lowest speed and gradually sped it up to be a little over 1000 revolutions per second (RPM). The first tool I used was the Rougher with a square carbide bit. I used the Rougher to smooth the outside so it would not be a rectangle. After I rounded it I used the Finisher with a circular carbide bit to add the grip to the solid Walnut piece. The two tone piece was round. The third tool I used was Beader to bead the pieces on the edges. Lastly I pressed the pen together.
My pen!
Today I am working on a pen here are all the things i did!
- I had to use a ruler and draw kind of straight lines from corner to corner with a ruler to determine the middle so I could drill a hole through the two planks.
- Then I used the pen kit that Doc gave me I took out the two brass tubes in it I used super glue to cover the brass tubes in glue I put the brass tubes in the holes in the middle of the planks.
- It was supposed to be a 30 minute wait but it kept being sticky every time I pick it up so I had to postpone it ’till after lunch.
- after that we used the drill to drill through the out side a bit then I used the lathe to make the rest of the outside a bit more thin first I used the rougher to make it thin then I used the finisher to make it a bit more smoother then I sanded it just to smooth it more i used a vacuum and a mask so I would not breathe in the wood dust.
- Then I used some clean finish so could finish it off then all i have to do now is wait!
- Okay! It was worth the wait! All i had to do was remove the pen parts from the lathe and boom! All i have to do now is get all the parts and use the pen press!
- Okay! I got the pen pieces and i used the pen press and pressed the pieces together and its done!
- okay this is the moment of truth I grabbed a piece of paper and… it worked! i am so happy any way that is the end of my blog post so goodbye!

led lights
These are my LED lights it was my first makerspace project.The soldering went pretty well when I got the hang of it, what didin’t go so well was ataching the wires to the terminal block.If I were to do it again I would put much less solder on the end of the wires.

Bob in a Box
I 3d printed Bob. First I started printing a Lego figure with a clear type of filament that is PLA. After that I painted it with some acrylic paint. To make the box I put Bob in I used the laser cutter on some transparent acrylic. It was bigger than a normal Lego but it was cool. I am putting together a bigger one about 3x the size but I had to print the head, body, and then legs because the legs came off mid print. Why I printed it? Because I wanted to. Plus I didn’t know what else to do.

November Ajax the Antweight Robot (part 3 codering)
this week of Makerspace Summer camp I coded my arduinos on arduino cloud.
here’s some of the code I made.
RF24 radio(2, 4); // Replace with CE, CSN pins on robot
const byte address[6] = “00001”;
int AIN1 = 6;
int AIN2 = 7;
int PWMA = 5;
int BIN1 = 9;
int BIN2 = 10;
int PWMB = 11;
int STBY = 8;
void setup() {
Serial.begin(9600);
radio.begin();
radio.setPALevel(RF24_PA_LOW);
radio.openReadingPipe(0, address);
radio.startListening();
pinMode(AIN1, OUTPUT);
pinMode(AIN2, OUTPUT);
pinMode(PWMA, OUTPUT);
pinMode(BIN1, OUTPUT);
pinMode(BIN2, OUTPUT);
pinMode(PWMB, OUTPUT);
pinMode(STBY, OUTPUT);
digitalWrite(STBY, HIGH); // Enable motor driver
}
void loop() {
if (radio.available()) {
int speeds[2];
radio.read(&speeds, sizeof(speeds));int left = speeds[0]; int right = speeds[1]; // Debug print Serial.print(“Received! Left: “); Serial.print(left); Serial.print(” | Right: “); Serial.println(right); setMotor(left, AIN1, AIN2, PWMA); setMotor(right, BIN1, BIN2, PWMB);
}
}
void setMotor(int speed, int IN1, int IN2, int PWM) {
bool reverse = false;
if (speed < 0) {
reverse = true;
speed = -speed;
}
speed = constrain(speed, 0, 255);
analogWrite(PWM, speed);
digitalWrite(IN1, !reverse);
digitalWrite(IN2, reverse);
}
This was to test the signal between the controller and the robot.
Makerspace Summercamp 2025
This summer my main goal was to help Oliver create a robot! After a little while I got bored of helping Oliver so I began fooling around with Harold. We made a few fake Pokemon cards and a few 3d models. One day Oliver had the idea to play a game of capture the flag but sadly my team lost. Later that day I learned how to spray paint planets! I made three planets and experimented on making different colored backgrounds. Harold and I also spray painted a plant!
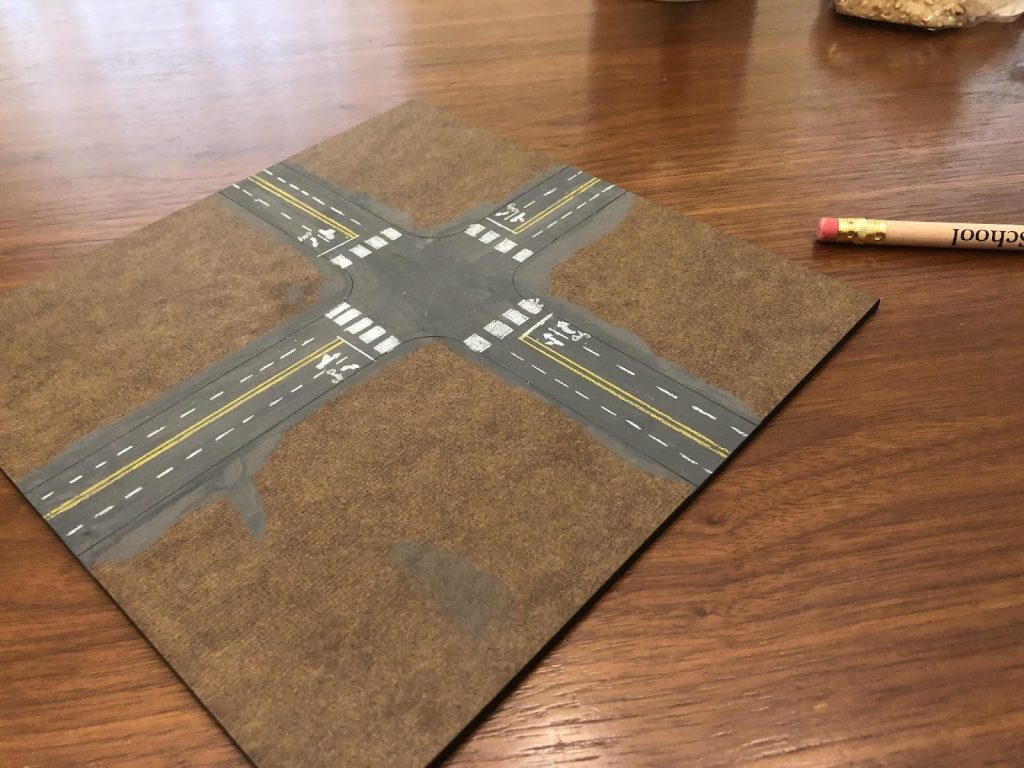
3D Map Project: Street

- Laser cut the map piece, with the street outline.
- Paint it Gray. (White to Black 3:1)
- Let it dry.
- Add details such as: crosswalks, pavement, with color pencils.
- Laser cut construction paper into sidewalk shapes.
- Check if it fits as a sidewalk.
- Paint it with (White to Black 4:1)
- Let it dry.
- Once dried, use super glue and glue on to the piece.
What you need: Patient, Laser cutter, Corel, White and Black Paint, Brush, Colored Pencils (Yellow, White)
For More Details, Images, Click HERE.
November Ajax The Antweight Robot (Part 3 Electronicing)
School has ended and I have just survived the first week of MakerSpace Camp, I will make another post in two weeks (Part 4 coding and Part 5 Controllering) in case anyone is actually reading these. I will show some pictures of my week.


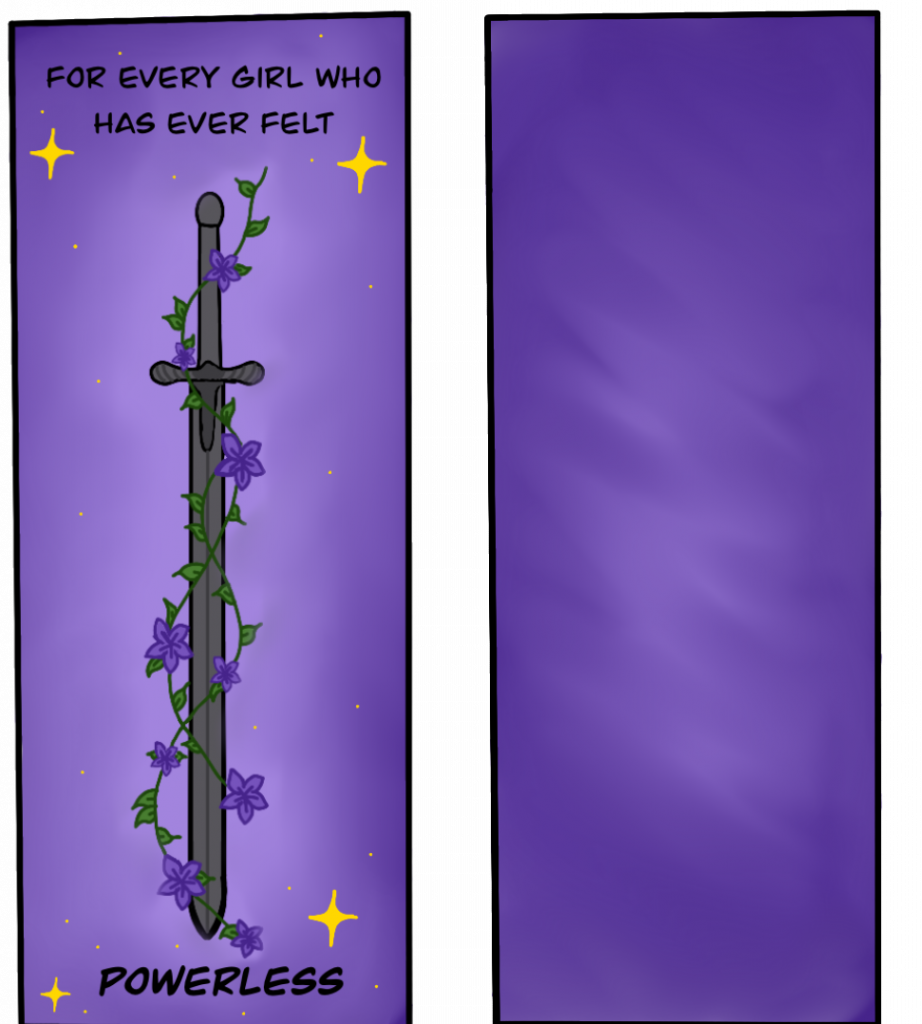
bookmarks
for my 4th quarter I decided to make 2 bookmarks that are based on some books I have read. since the bookmarks are based off of the books they look like the covers, so they have some of the same important items and colors. I designed them on procreate and then printed them out and laminated them. they took me way to long to make but it was worth it. this was one of my favorite things I have made this year and I am going to make more bookmarks soon.
here is what one of the book marks looks like.
Recent Comments