Tri State Area
Makerspace at the Fulton School
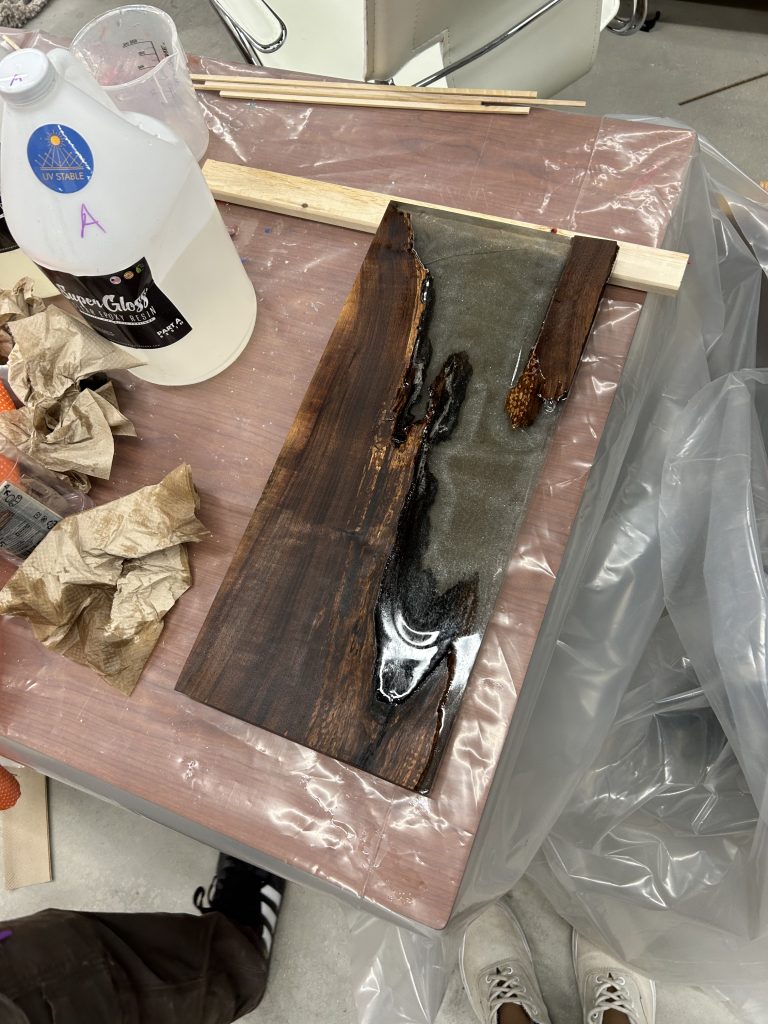
Cutting Board
In this project, I wanted to create a cutting board of sorts as a present.
I spent a lot of my time finding the best two pieces of wood in order to create the riverlike feel to the board.
I created a mold with wood and epoxy tape and then poured the epoxy.
I used the table saw to cut the edges and sanded the bottom.
lastly I oiled the top to make it usable for a cutting board but due to the length and minimal width it might be best as something else.
Through this project I learned the struggle of the buoyancy of the wood and the epoxy.
Overall the project ended looking good with a few minor flaws.
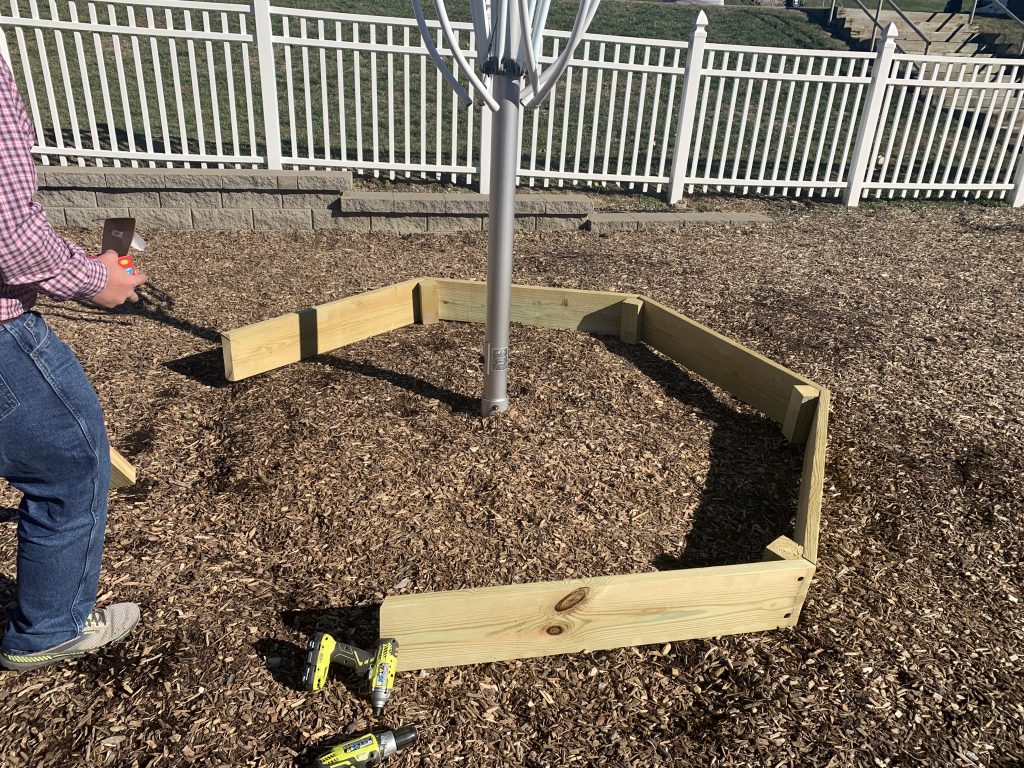
Sandbox
For the second Quarter of makerspace I finished building the sandbox for the lower school. The sandbox is a hexagon. I built the sandbox design that Lily made. The ends of the wood planks are cut at a 30 degree angle to have a smooth hexagonal shape.
Makerspace project part 2
During the last semester Ella and I had a bunch of different ideas for projects we could accomplish its been a slow process trying to pick a project to start with. Our ideas were to maker more bird houses, paint some walls in makerspace, make monogrammed shirts, use our art ideas to our advantage. However in the end we decided to do the wood cutout project because it was an urgent thing to do. We plan to doo a lot more projects this next quarter over the next few months. We had some crazy ideas that would make the makerspace area much better however of course we are very indecisive. We plan too do a bunch this year. I feel like our project that we are going to finish is going well. We are hoping for no bumps in the road on our journey doing projects.
Makerspace project
For my makerspace project My partner Ella and I took the list of students of the whole school names and put there names onto wood cutout shapes to display in makerspace. The process of doing this was Ella was on the website where you edit the names. I took the list of students that still need the wood cutouts and read them out loud to Ella as she typed them to the website. I First read the Toddlers name by name, than I read the Preschool and the project is to be continued. As I read them names of the students I put check marks next to the names to keep track of all the students I already read. I read 41 students to Ella and she made there names on the website to print out. Soon the whole student body will have there names on the wood cutouts. The description of the website we used was a graphing and editing website with different fonts. This was our makerspace project. The project has gone well so far I think the strategy that we are using is working the best. Like I said we plan to have the whole student body have there names on the cutouts/
Family Wall Piece
A Christmas present I made in the makerspace this quarter is a family wall piece. The first thing that I did was find a picture of two branches with leaves. I wanted two branches so that I could do two layers and have the branches overlap each other. After I found the picture I made it so that it was only the outline of it. None of the leaves were connected to the branch after this so I had to individually connect all of the leaves to the branch. After, I connected the branches to a border. I then created the hanging names. I had to delete all of the parts that the hanging part was going through the branch so that it would not cut off anything, this part took a long time. After this, I put “KEY FAMILY” in the back layer. After cutting it out I wood-glued both of the frames together. This project turned out very well. If I were to do something different about it I would make it a little bigger.


Coffee Tray
One of the things I have made this quarter is a coffee tray. My dad was using a cardboard box to hold all his coffee essentials so I created a new one out of wood for him. I used Inkscape to make a box then left the top open creating a tray and imported the file into CorelDraw. I then found a simple picture of a coffee cup and put it in the center of the tray with the word “coffee” underneath it. After that, I put holes into two sides of the tray so that it could be carried. After cutting it out I needed to assemble it. I put wood glue on the parts that were connecting to each other to have more strength. The tray holds so much more than I thought it would and I am happy with how it turned out.


LED night light
For one of my makerspace projects, I made a LED night light. The first thing that I did was create the box in Inkscape. I put a level in the middle of the box so I could later put the LED strip on it. After this, I designed the heart. The only difficulty with this was connecting the heart to the words in a way that flowed together nicely because I could not put the heart in the same font as the letter and just type it in. I then soldered wires to a raspberry pi pico. This was new for me and a little difficult. After that, I soldered the other side of the wires to the LED strip. I connected the raspberry pi to the bottom of the box with little screws and put the LED strip on the second level of the box. Dr. Urbano then uploaded code onto the raspberry pi to show the rainbow on the LED strip, which lit up the heart.


[Maker] Space Painting
For another project I decided to paint a painting to represent makerspace and I thought a fun way of doing that was to do a space themed painting! The painting features the solar system with the sun and planets, a comet, an alien, a rocket, and the moon. The painting isn’t done yet, but I also plan to add stars as small white dots in the background. I would also like to add “Makerspace” somewhere in the painting and I think a fun way could be to have it spelled out in the stars like a constellation. After winter break I plan to finish the painting. Here is a progress picture:

Makerspace Help
Alex and I helped Dr. Urbano in makerspace by typing out more names on the tiles that were a part of the world wide technology project last year. It was the last day before winter break and between finals so we only worked for a little bit, but I believe we got the pre-school class done. Once we’re back we will probably finish typing the rest of the names and could also help by handing them out to the kids to decorate.
Ideas
I had the crazy idea to build a headboard for a bed. I saw a heart shaped headboard on pinterest but I can’t seem to find it anywhere that I can buy it. So I might just make it. Amelia said she would help me if I do decide to make it. I will probably only make it if I finish my coffee table. You guys will just have to wait and see!
Recent Comments