Tri State Area
Makerspace at the Fulton School
Makerspace Progress
I have been working on two websites: the first one being the website for the Makerspace Business Club, and the second one being the macro-invertebrate log for the ITEF grant. Neither of them are done yet, but the both of the websites are up and (more or less) functional.
Raspberry Pi Stepper Motor 28BYJ-48
Too set up your stepper motor you first need to make the circuit. You can connect the motor straight to the raspberry pi if you would like. I used this link. Make sure you know what GPIO you use for the four inputs.
Next, you need to set up the code. I used the link below for the initial code and then modified it to specific uses I wanted the motor to do. You will need to put parentheses around all the print statements.
I wanted to control two motors, direction and how many rotations the motor spins for. For that use the code below.
from time import sleep
import RPi.GPIO as GPIO
import os
import random
GPIO.setmode(GPIO.BCM)
class stepmotor:
def __init__(self, IN1, IN2, IN3, IN4):
self.IN1 = IN1 # IN1
self.IN2 = IN2 # IN2
self.IN3 = IN3 # IN3
self.IN4 = IN4 # IN4
self.time = 0.001
GPIO.setup(IN1,GPIO.OUT)
GPIO.setup(IN2,GPIO.OUT)
GPIO.setup(IN3,GPIO.OUT)
GPIO.setup(IN4,GPIO.OUT)
GPIO.output(IN1, False)
GPIO.output(IN2, False)
GPIO.output(IN3, False)
GPIO.output(IN4, False)
def Step1(self):
GPIO.output(self.IN4, True)
sleep (self.time)
GPIO.output(self.IN4, False)
def Step2(self):
GPIO.output(self.IN4, True)
GPIO.output(self.IN3, True)
sleep (self.time)
GPIO.output(self.IN4, False)
GPIO.output(self.IN3, False)
def Step3(self):
GPIO.output(self.IN3, True)
sleep (self.time)
GPIO.output(self.IN3, False)
def Step4(self):
GPIO.output(self.IN2, True)
GPIO.output(self.IN3, True)
sleep (self.time)
GPIO.output(self.IN2, False)
GPIO.output(self.IN3, False)
def Step5(self):
GPIO.output(self.IN2, True)
sleep (self.time)
GPIO.output(self.IN2, False)
def Step6(self):
GPIO.output(self.IN1, True)
GPIO.output(self.IN2, True)
sleep (self.time)
GPIO.output(self.IN1, False)
GPIO.output(self.IN2, False)
def Step7(self):
GPIO.output(self.IN1, True)
sleep (self.time)
GPIO.output(self.IN1, False)
def Step8(self):
GPIO.output(self.IN4, True)
GPIO.output(self.IN1, True)
sleep (self.time)
GPIO.output(self.IN4, False)
GPIO.output(self.IN1, False)
def left(self, step):
for i in range (step):
self.Step1()
self.Step2()
self.Step3()
self.Step4()
self.Step5()
self.Step6()
self.Step7()
self.Step8()
#print (“Step left: “),i
def right(self, step):
for i in range (step):
self.Step8()
self.Step7()
self.Step6()
self.Step5()
self.Step4()
self.Step3()
self.Step2()
self.Step1()
#print (“Step right: “),i
#def move2right(steps):
# for i in range(half):
# motor1.right(1)
# motor2.right(1)
# sleep(0.05)
half = int(512/2)
quarter = int(512/4)
full = int(512)
twice = int(512*2)
motor1 = stepmotor(2,3,4,10)
motor2 = stepmotor(17,27,22,18)
for i in range(twice*10):
motor1.right(1)
motor2.left(1)
GPIO.cleanup()
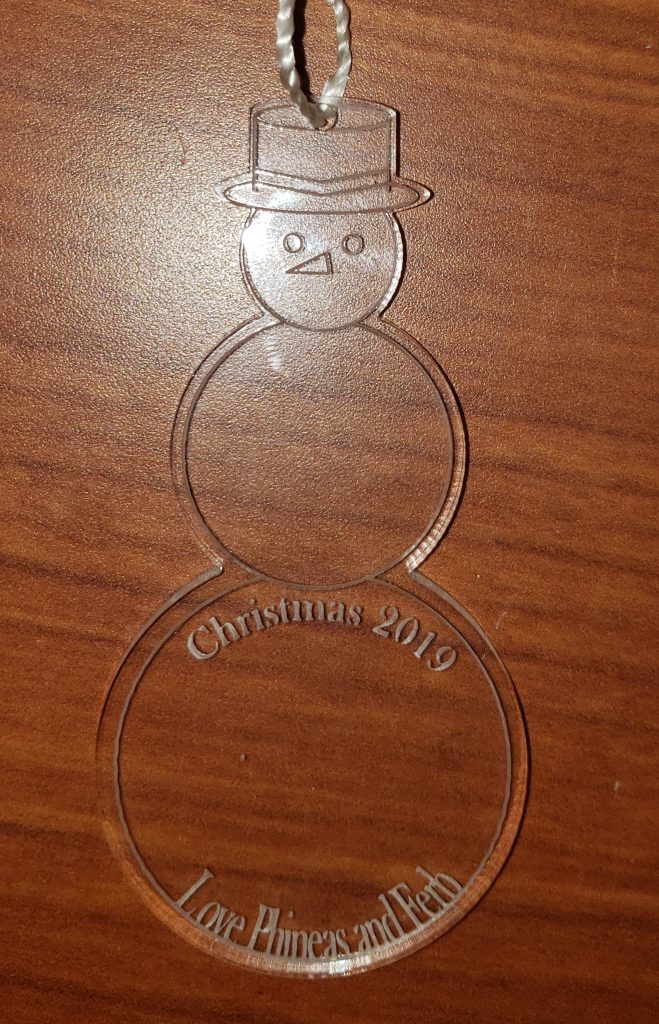
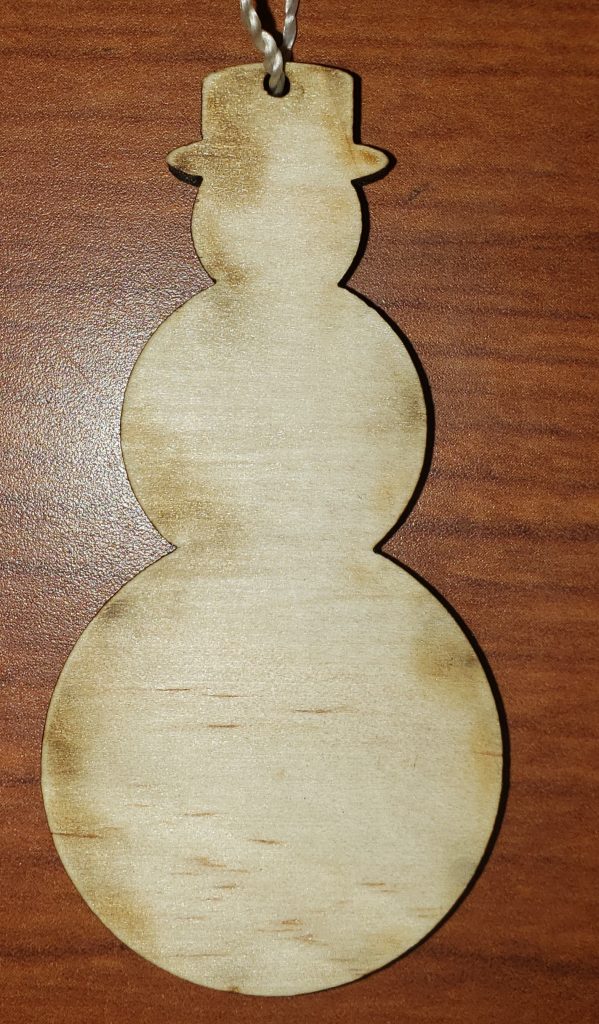
Snowman Ornaments
During the interim last week, I made snowman ornaments in Makerspace Business. I made a basic design of three overlapping circles, and then designed a hat. I then had to figure out how to make an outline that cut out, and if I did it the way I am used to, I would end up cutting out three circular shapes with an oblong piece missing. So I had to make arcs on the outside, about 1/8 of an inch away from the snowman, that would cut out. I then added the words and finally printed it out on clear acrylic and on wood.
My 3D Printing Experience
Hello, I am Holden Appell, and for my P.M. interim, I chose to do 3D printing. Doctor Urbano started by telling us to scan a cup. we decided to spin the chair while someone scanned it. I spun the chair while someone else scanned the cup. In the end, the 3D scan of the cup ended up looking good. Someone had the idea of using a turntable, and 2 days later, we had a turntable. The next thing I did was go outside and collect some other items to scan. I picked up a stick and a rock, then took them inside. After that we spun the turntable and scanned the items. Michael scanned the rock, while I scanned the stick. With a bit of help, the twig was starting to print. When it was done, another print, this time of a bust with a hole in it was told to start being printed. At the time I am typing this, it is the last day, and I can say that I enjoyed this interim.
My week in Interim
The week I had in Interim with Dr. Urbano was enriching and exciting. It taught me many valuable skills having to do with computers and computer programming. I learned a new programming language, php, I learned how to use a Raspberry Pi, and I learned how to make complicated circuits to execute certain tasks. I made a distance sensor which required a complicated procedure of circuits and Python. I learned how to code in JavaScript better so that I could make a responsive form for the Shaw Nature Reserve Education Program. I learned how to use a node editor called Node-RED to program a temperature sensor. All in all, I have learned a lot. I will take away a lot of knowledge and hopefully apply it in other situations. I hope that I can do this again so as to learn more about these subjects.
How to 3D Scan an Object
HOW TO SCAN AN OBJECT:
- Choose an object and place it on a tall surface or if you’re planning on spinning the object to scan it, place it on the lazy susan. If you’re scanning a person, just have them straight sit on a tall chair.
- Take 3D scanner and press the top button to preview the scan.
- Watch the range bar on the side of the screen and position the scanner to a point where the bars are in the center and in the green.
- Follow the steps below and begin scanning.
FOR ANY SCAN: Do not look at the person or object you’re scanning, just look at the screen to constantly monitor the range bar.
IF YOU’RE SCANNING A FACE- Have the person look up at the ceiling and hit the top button to start scanning from below the chin, slowly move the scanner to the side of the face, then the middle of the face and then the other side. Make sure the person being scanned doesn’t move. If the person you’re scanning has dark hair, have them move their hair back so you can get a better scan of their face. The scanner doesn’t read dark colors that well.
IF YOU’RE SCANNING AN OBJECT- Hit top button again to start scanning and stand in a stationary position. Have someone slowly rotate the lazy susan in a full 360 spin. Another way to scan would be just walking around the object. Sometimes this method works better, but it will differ with the different objects you scan.
IF YOU’RE SCANNING A FLAT OBJECT- Follow the same rules as you would when scanning an object, but make sure the flat object is sitting straight up by propping it up on a small square block or stick it into Model Magic Clay.
5. Once fully scanned, hit the square button on the scanner to stop the scan.
6. Take a look at the scan and assess what steps need to be taken to finish up the scan.
HELPFUL TIPS:
If scanning a face- the best way to scan would just be the front and sides of the face. If you try to scan the entire head, you could lose range in the scan. Start by using the autopilot feature after you scan. This will help you get the most realistic bust of the head.
Make sure to keep your wrist loose and your arm away from your body when you scan. You don’t want to be stiff, this will result in a rough scan.
How to 3D print an object
3D instructions
- Turn on the 3d scanner
To turn it on you must plug in the 3d scanner cords because there are two cords plug one into the computer and one into the outlet you will know if it’s on if you hear a motor running.
- How to work the 3d scanner
To scan the object you have to click on the preview and the lights will turn on. Then you press the play button causing the colors on the screen to change from a range of red to green showing if you are close or far. After you have pressed play you will see spikes on the computer the farther you are the higher it will go the closer you are the lower it will go. You want the spikes to be in the middle of the bar for a more successful scan.
- Begin the scan
Now that you have the scan running properly start to make your way around your object in a full circle. If you run into an error with the scanner try to back up from your object a bit. After you have gone around a full circle make sure to move the scanner above the object to just in case it hasn’t caught it on the scanner.
- Fix the scan
After your done with scanning you will have your results on the computer. It may or may not look a little crazy but that’s ok you have the opportunity to fix it. There is an editing tool on your computer to fix the scan. These tools include the eraser, smoother, and filler which will change your scan results. When you click on one of the tool icons it will give you instructions below to explain it so the tools are self-explanatory they will tell you what to do.
- 3D print object
When you have your scan smoothed and filled and whatever you need to print it. To print it you have to save it on the computer to the flash drive. Load it into the drive then take it to the other computer. After you have found the file and selected it in the 3d printing program then shrink it to size. Make sure that nothing is on the edge of the base by shrinking it if needed and then print the object.
That is all of the steps on how to 3d print an object -Bryce Mertens and Jack Fadlovich
Foosball table project
We want to make a new foosball table for high school so that is my mission for this year

Coasters 2.0
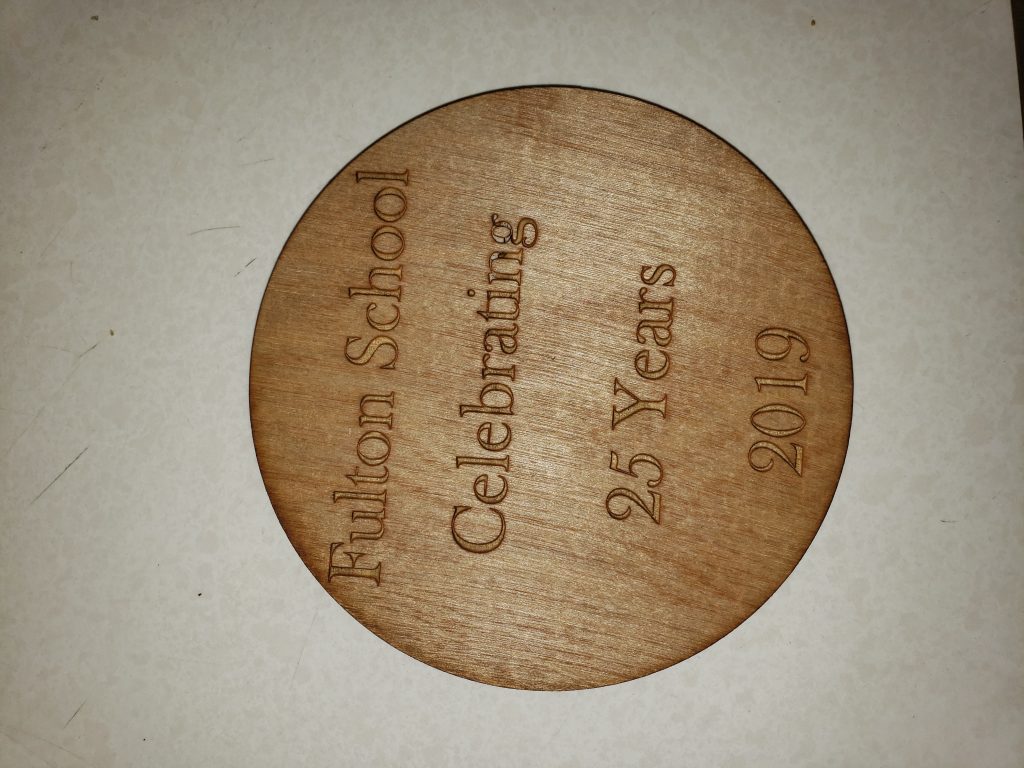
I have been working this year on making coasters to celebrate the school’s 25th anniversary. This is one of the 10 designs so far.
Building a Greenhouse ‘Round the Dusty Stuff
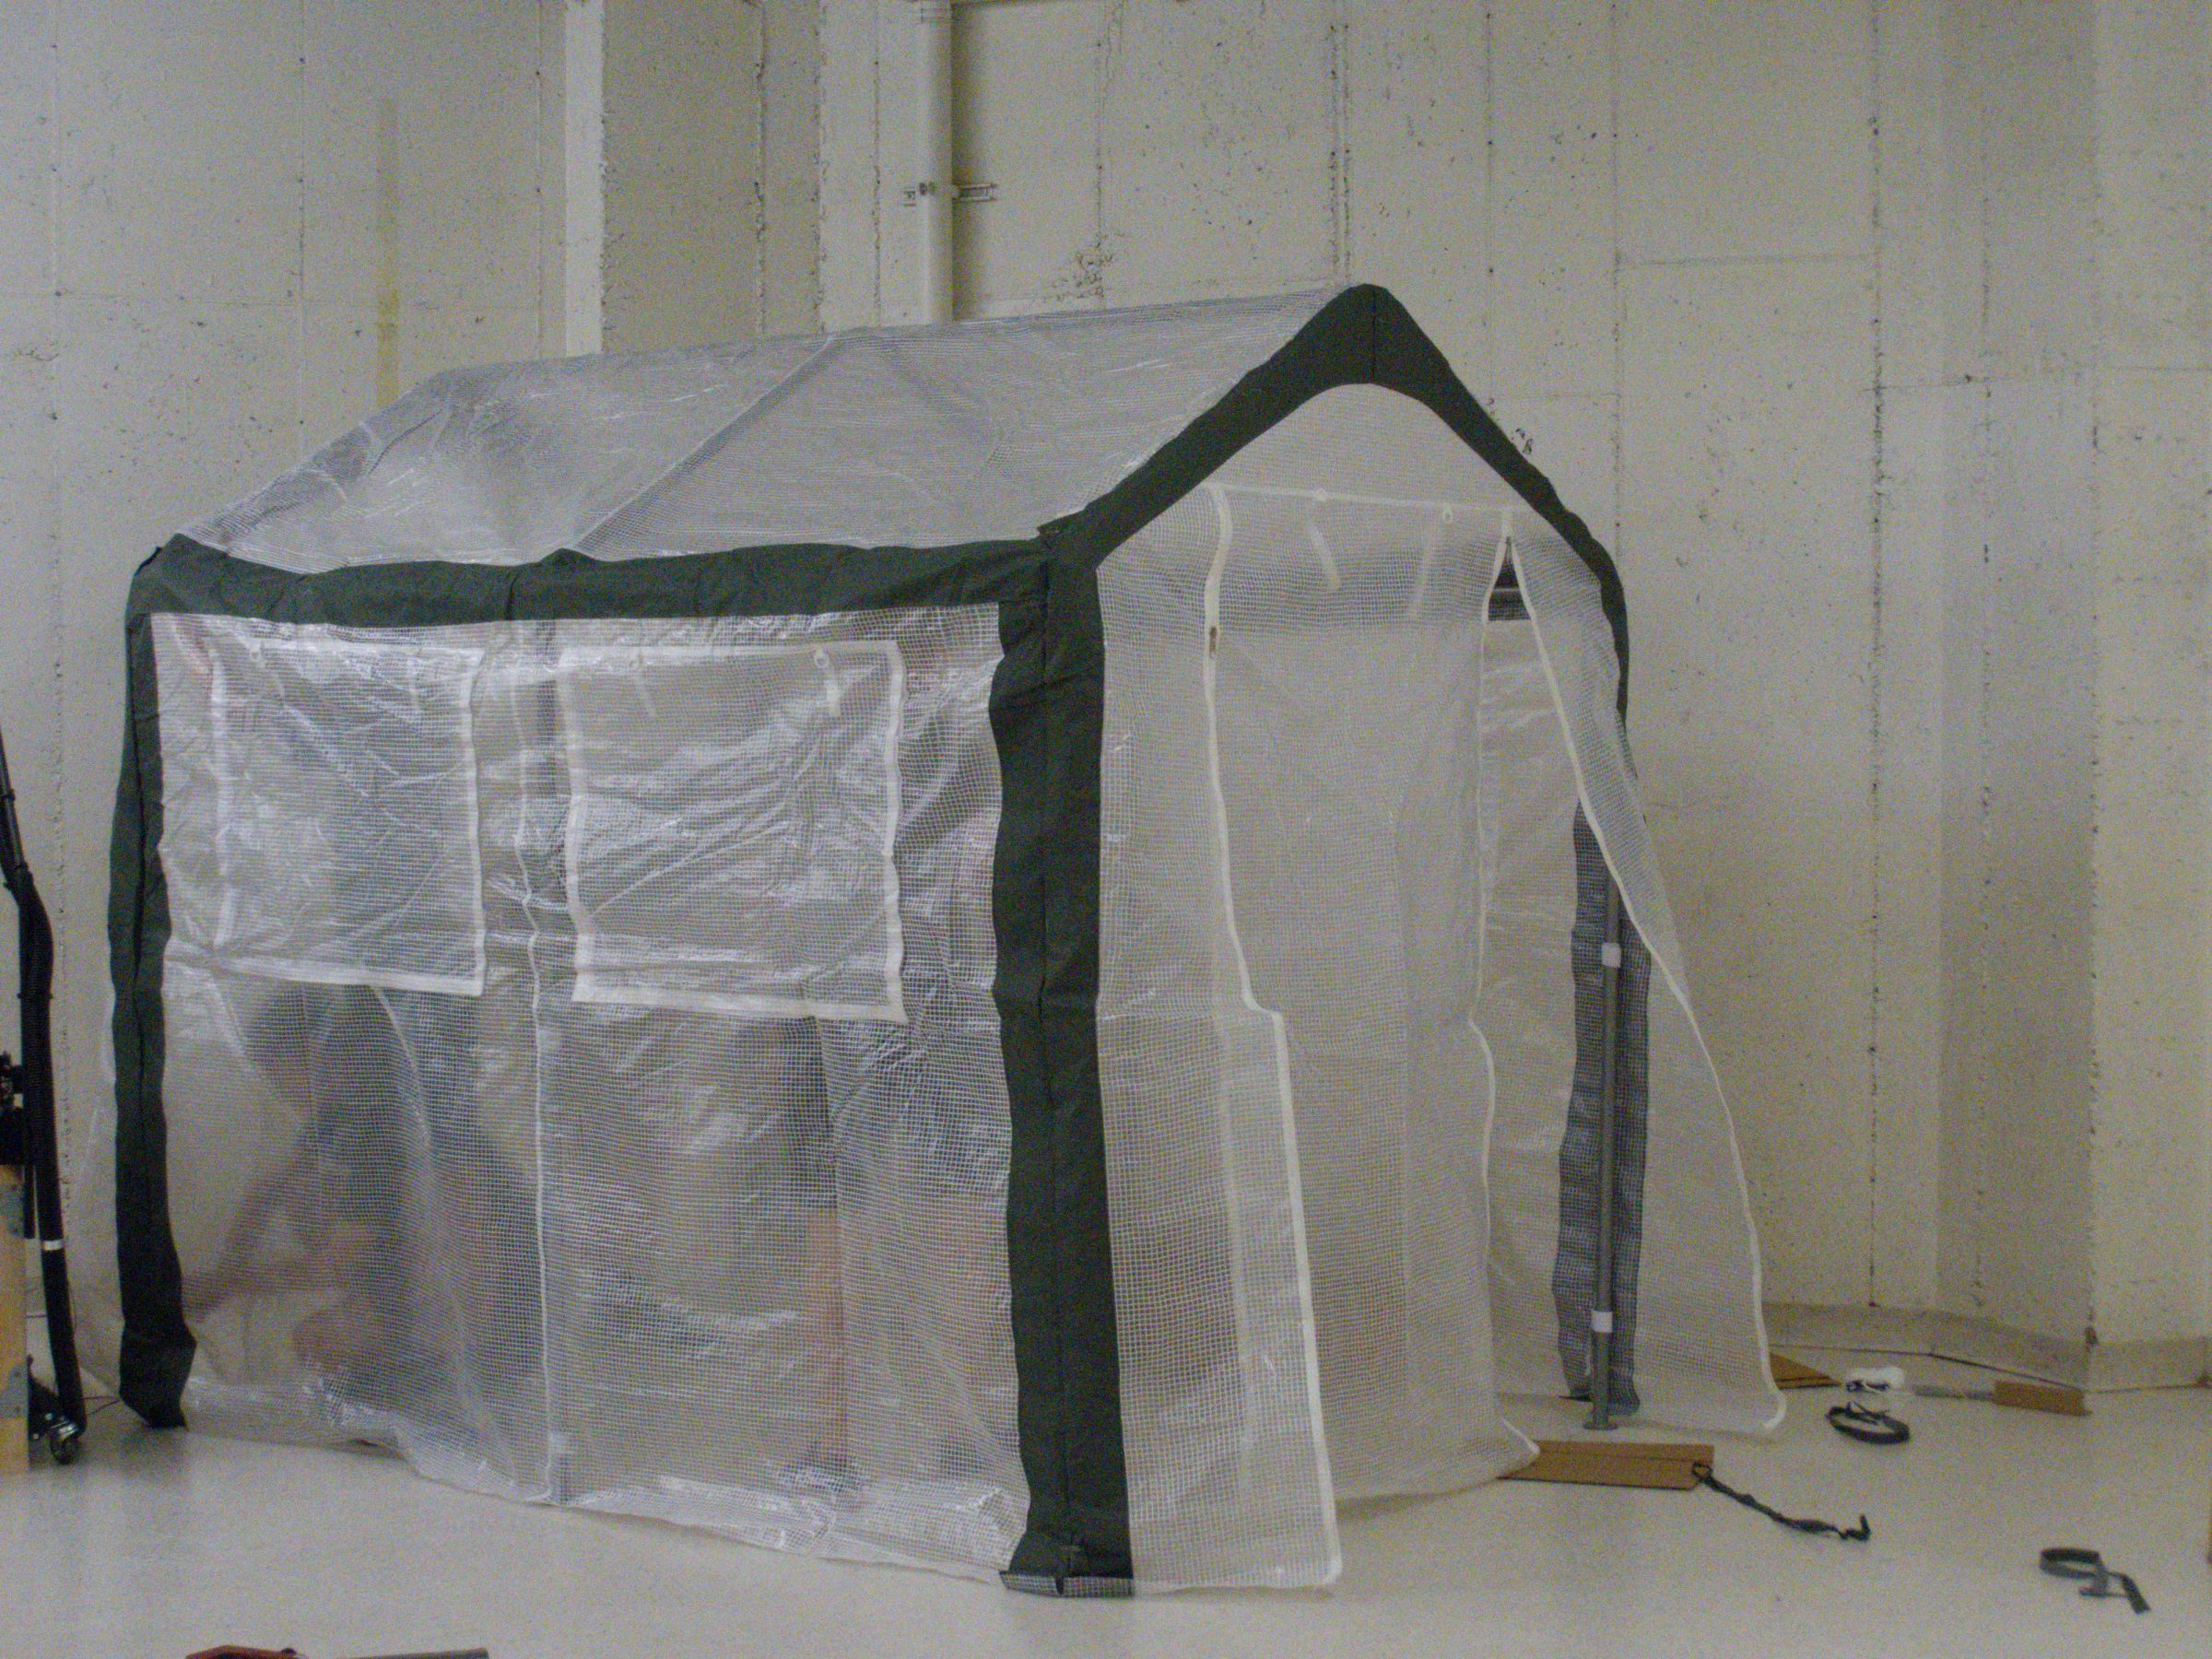
We built a greenhouse around the sander in order to keep the dust in. The whole basementnasium will not get super dusty now. We have a dust collector inside to filter the inside air also. As long as we keep the walls closed the dust should stay inside.

Recent Comments