Tri State Area
Makerspace at the Fulton School
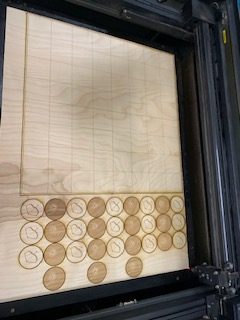
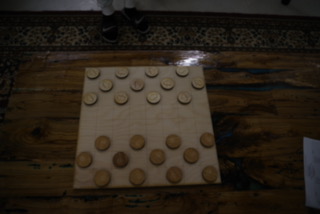
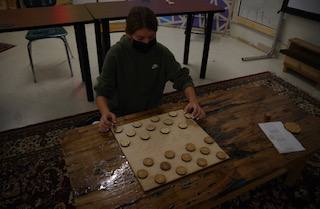
Greek and Persian Chess; a PECULIAR project
Originally I was going to make this game into chess but that became a PeCuLiAr project. It was hard because I was planning to make one side of the pieces represent Greeks and the other side was going to represent Persians. The problem was that with chess there are several different types of pieces and it was going to be very complicated to figure out what I wanted to make for each of these pieces. I would have been able to do it but I didn’t have enough time because of the due date for this project. I ended up just making checkers with one side using a bow and arrow to represent the Persians and the other side with a spear and shield to represent the Greeks. I drew the bow and arrow along with the spear and shield on Procreate and used my drawings to etch on the pieces. If I had more time I also would have stained the checkerboard to make it look more finished but I ran out of time for that as well.
Painting a Birdhouse; a PECULIAR project!
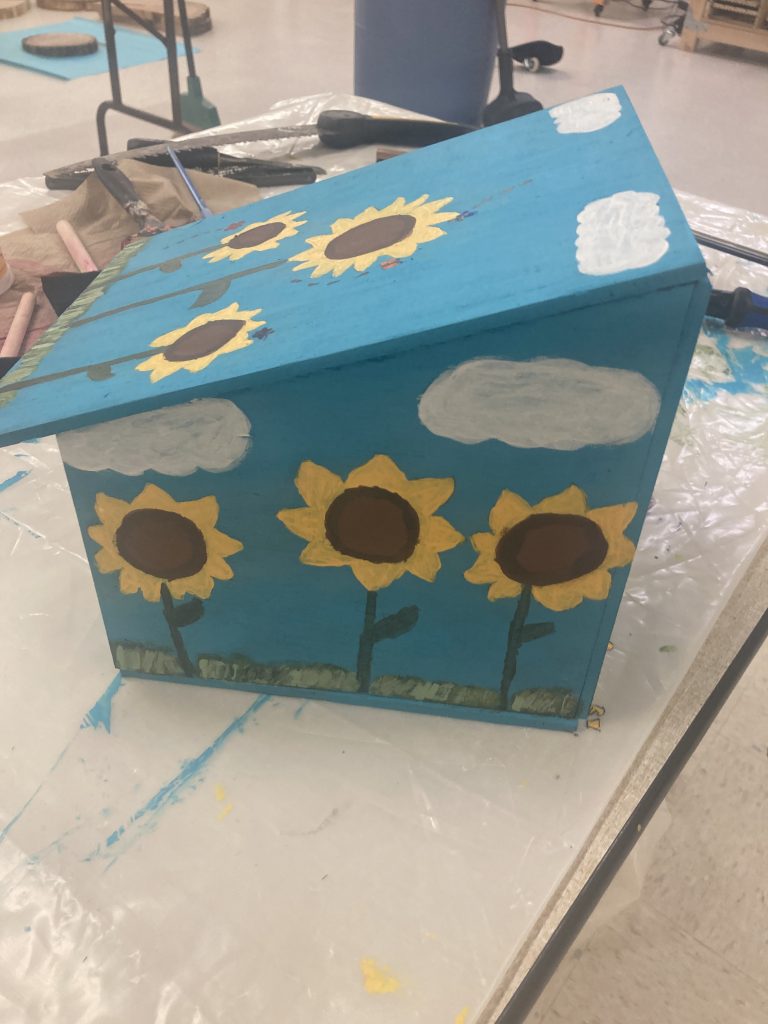
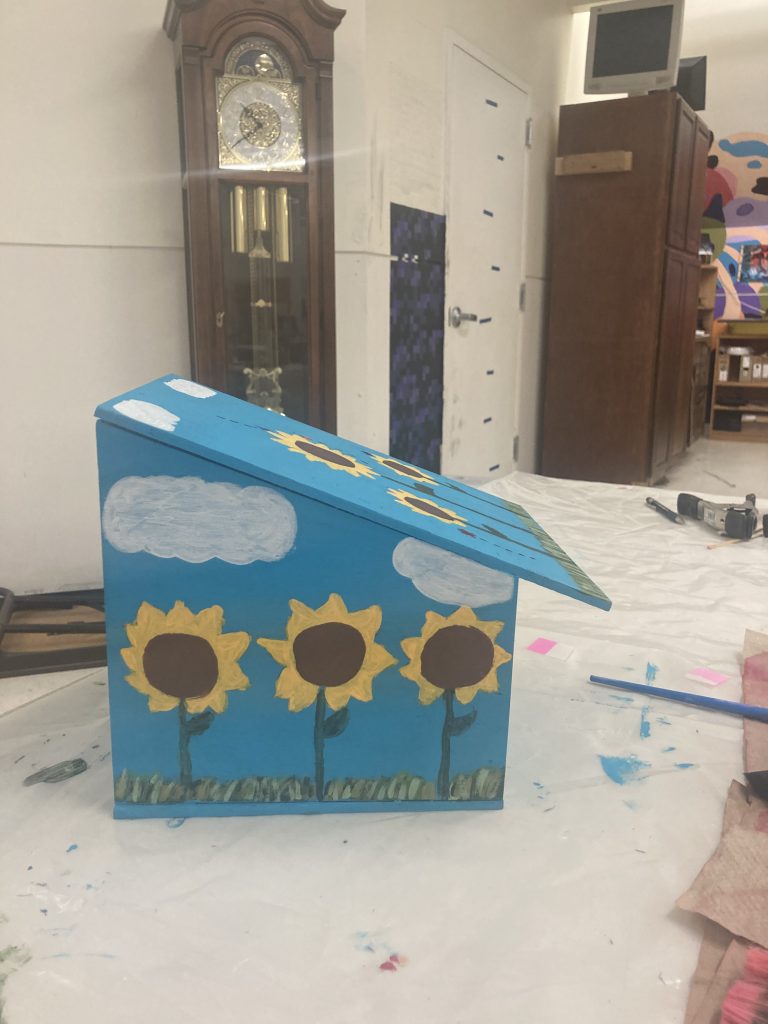
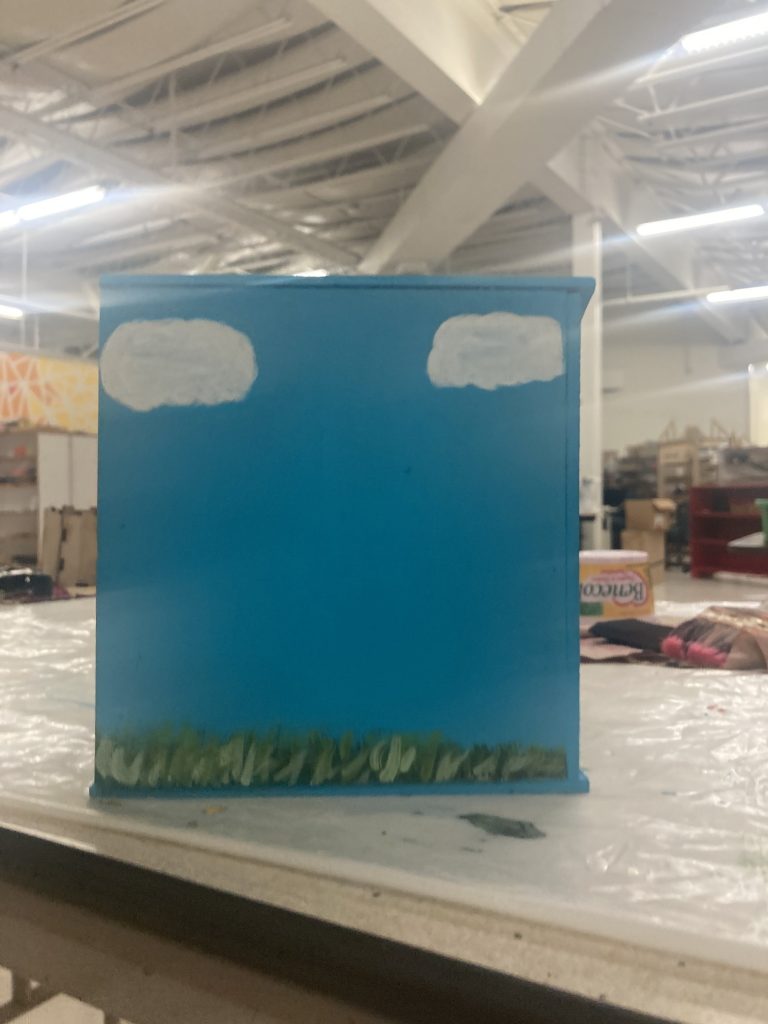
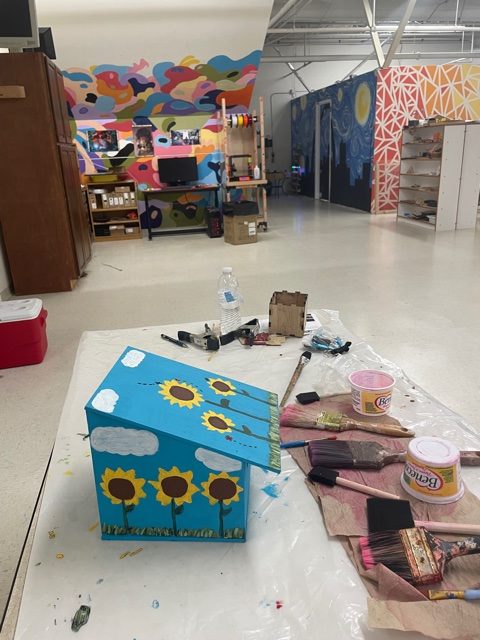
At the beginning of the year Alex and I made a list of ideas of makerspace projects we could do. One of the ideas we came up with was to make and paint a birdhouse. We were originally going to make a bird house from scratch while looking for wood to make it we found a bird house that was already made. How peculiar! Any little lad would be so surprised and amazed by what we have in the makerspace! So, we figured we might as well just paint the one we found right away. First, we talked about what we wanted to paint on it. We decided on painting it blue, with sunflowers, grass, and some butterflies. The first step was painting the background of the house blue. We did about three coats of paint and then sketched out the flowers, clouds, grass, and butterflies. Then we painted the flowers and grass. Lastly, we painted the clouds and butterflies. On each item we did multiple coats of paint to make it bolder and more colorful. Overall it was a very fun project and I would enjoy doing it again but actually making the bird house next time.
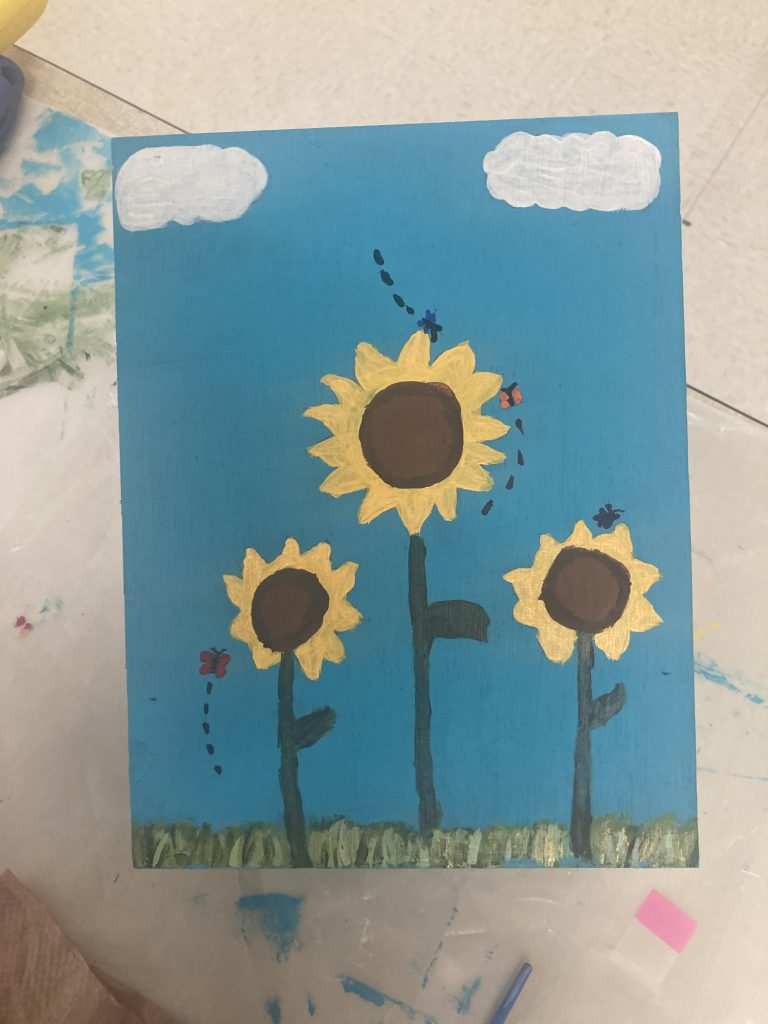
Bird House process
For the past quarter Ella and I have been working on this birdhouse somebody made the birdhouse but me and Ella took it in too our own hands and decided to paint the bird house. The process was we first painted the whole bird house a ocean blue color than after that dried a couple days later, we decided to do a flower design theme with sunflowers on both of the sides with grass and also with clouds on each side. Than finally on the top we decided to put some mini sunflowers on the top than it was finished. That was the process of this project we hope to hang the bird house outside for little birds for the lower school.
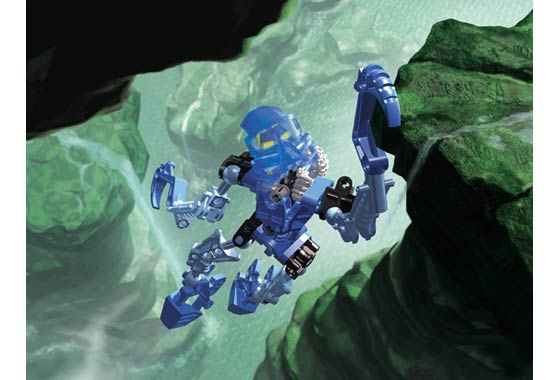
Adaptive/Nuva armor and Enhancements to Toa Mata
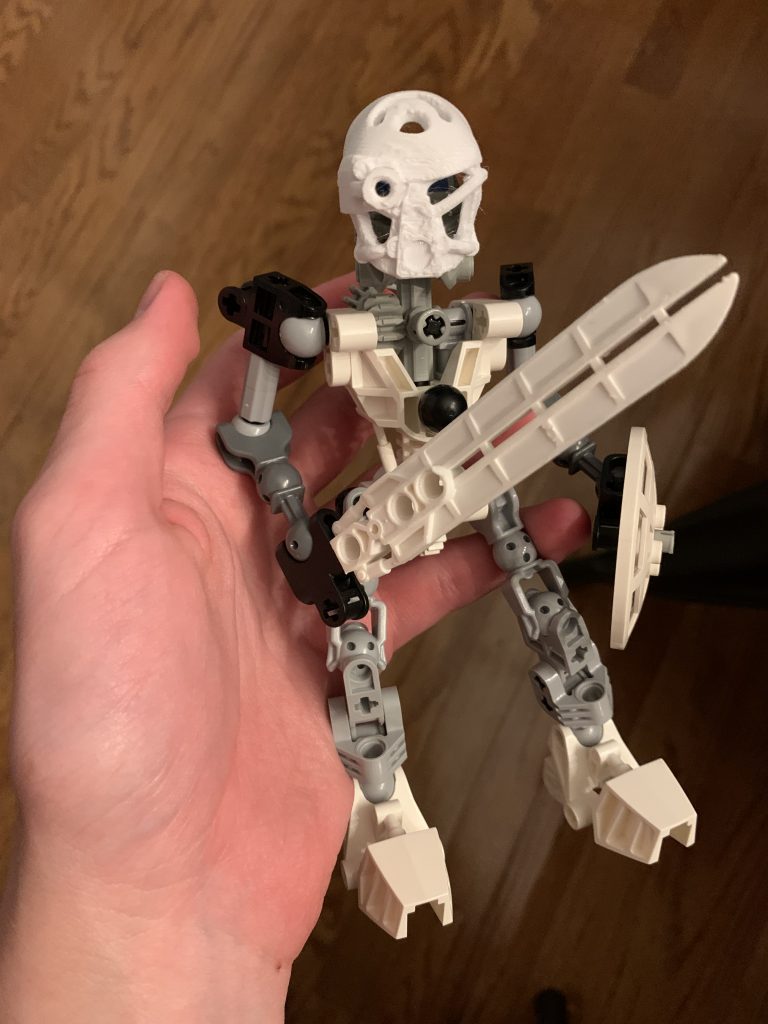
This project aims to modify the 2001 Toa mata to have better articulation and access to all of their forms while retaining the base mata/nuva type body with all of the functions that come with. However, this is mainly about the new masks for these forms and what modification was required to mke it work.

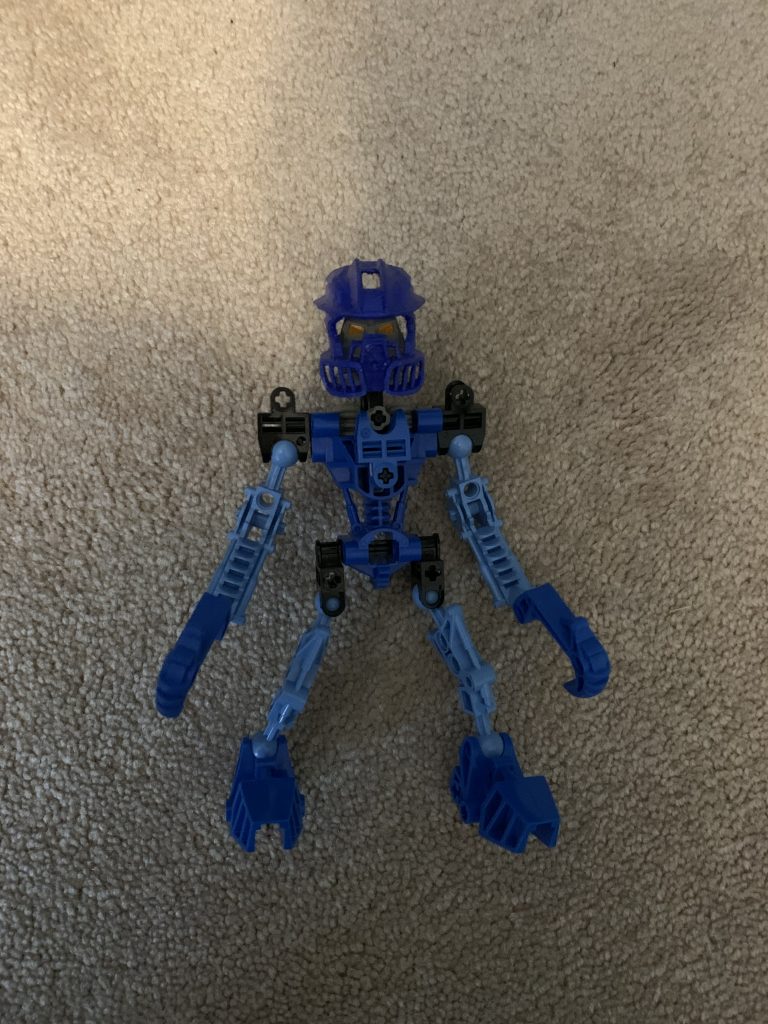
From 2001, these are the base the project works on to improve and to make compatable with later forms. A basic modification to temporarily disable the gear function and lock the arms in place came with their nuva forms, but works on these guys as well.

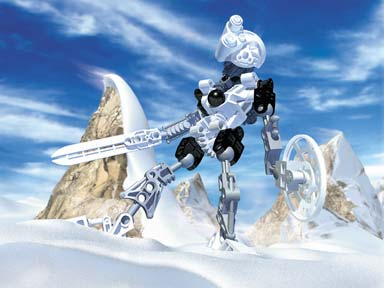
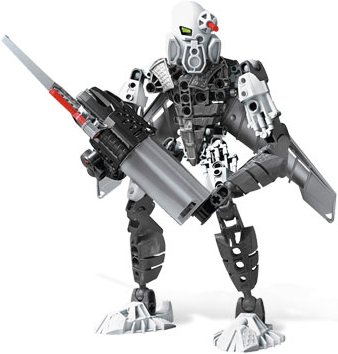
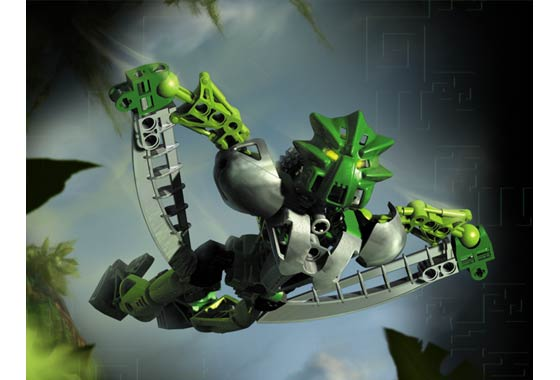
These are the forms that the Noa Mata took at the end of 2002 after being dumped in what is essentialy their version of electric primordial soup. These guys have multi function weapons, alongside an extra gear and size three axle to lock up the gear funtion and hold the arms/legs steady.

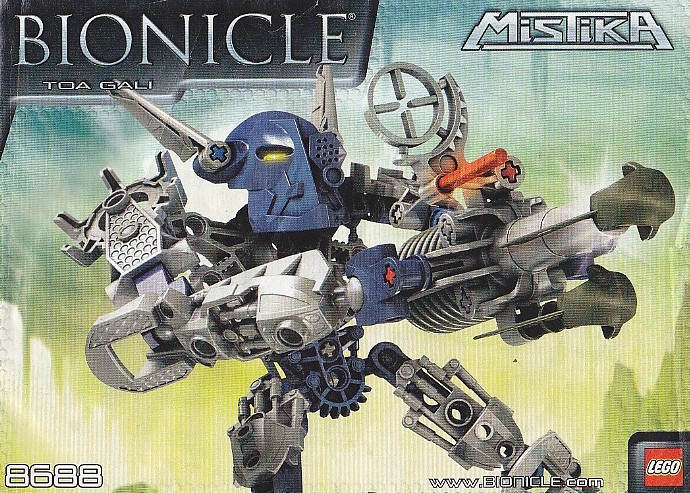


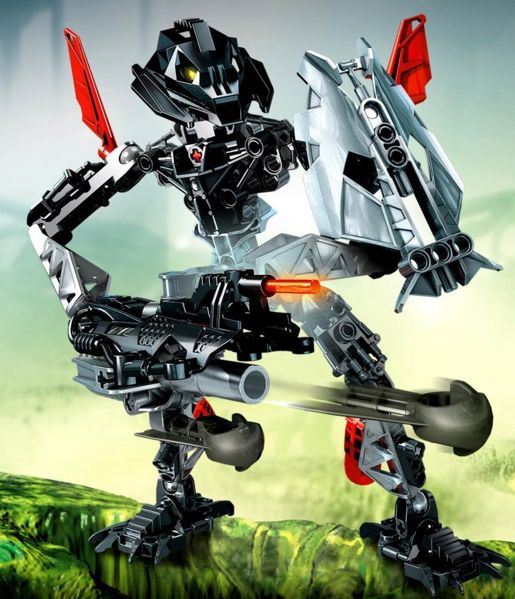

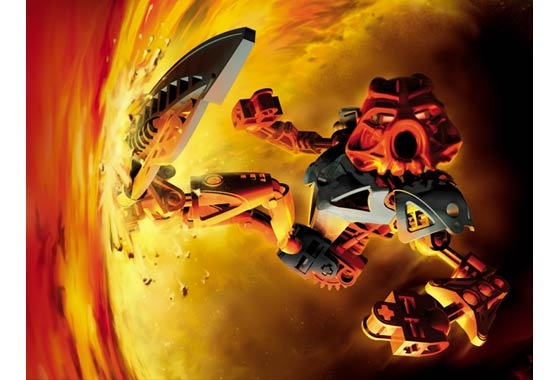
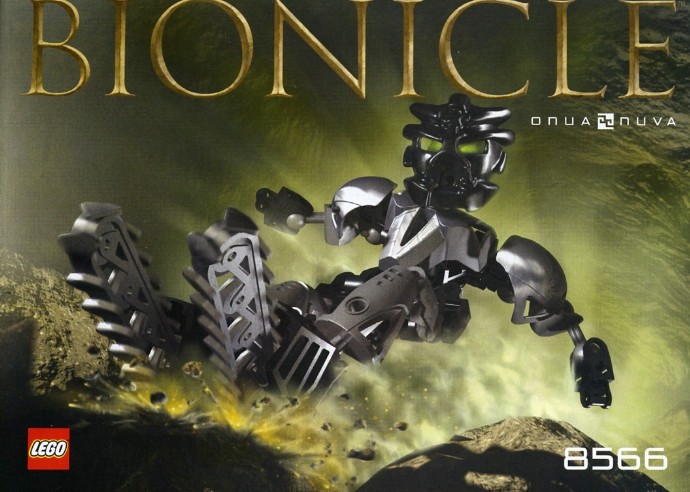
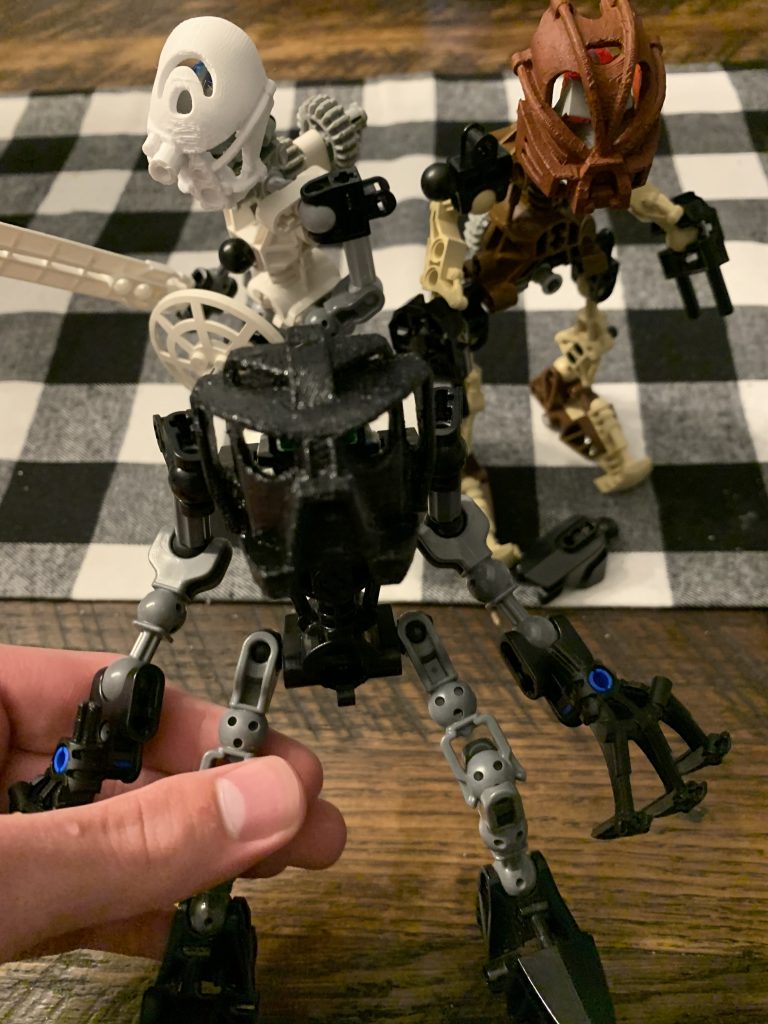
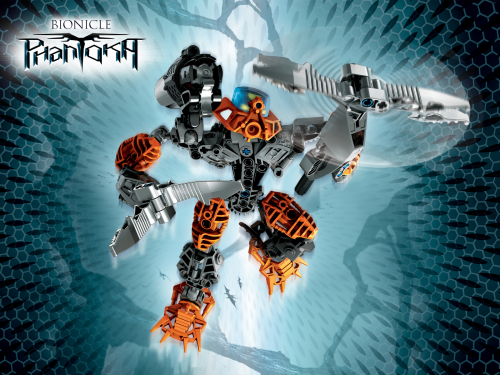
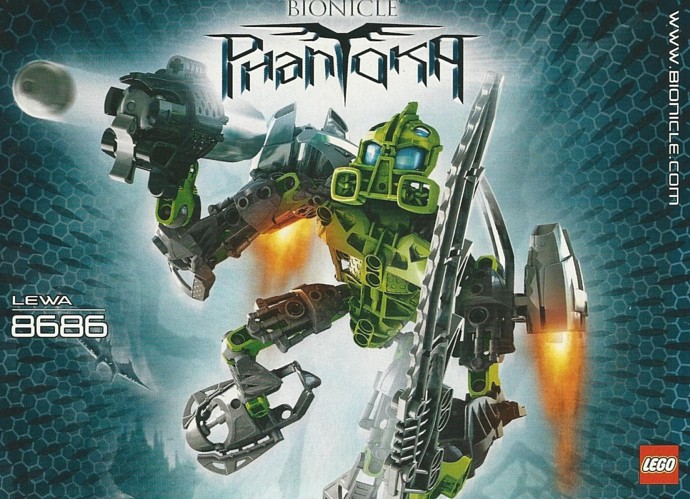
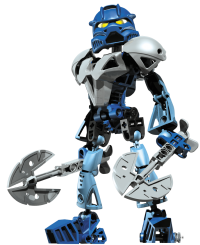
These are the forms the Toa Nuva took in 2008. Divided into two groups, (Phantoka and Mistika) many thought that these designs were not true to the characters. The main things that I think caused this view are the masks and torso builds. Other than that, there are many cool aspects of these designs that I would like to carry over into the project.

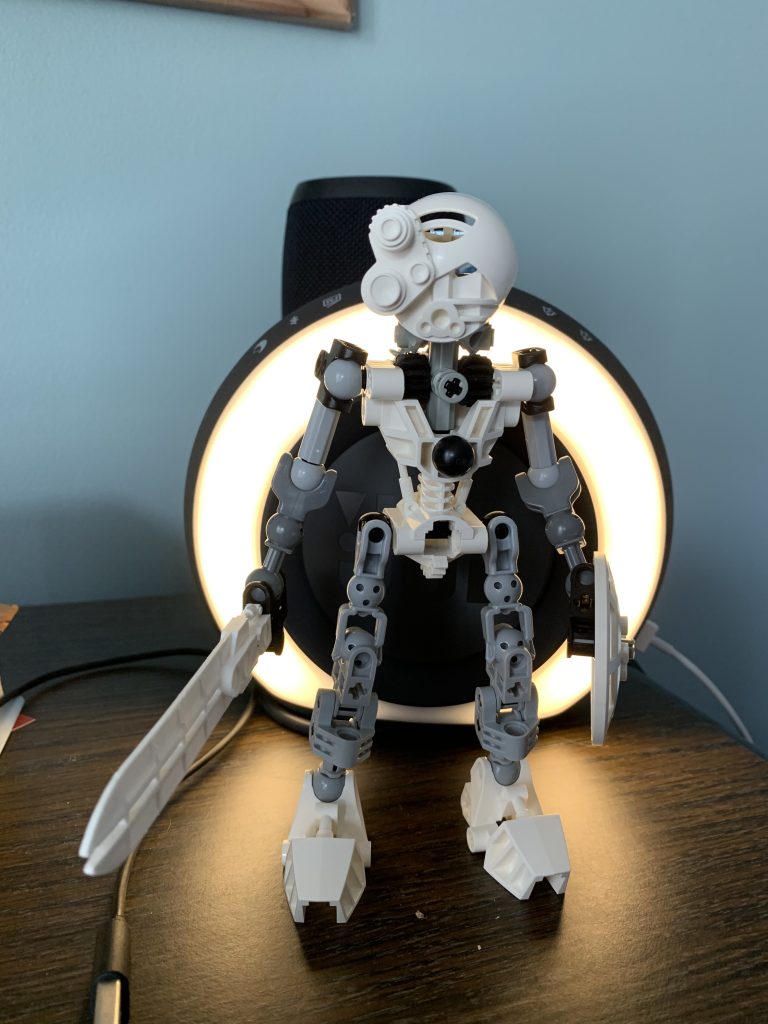
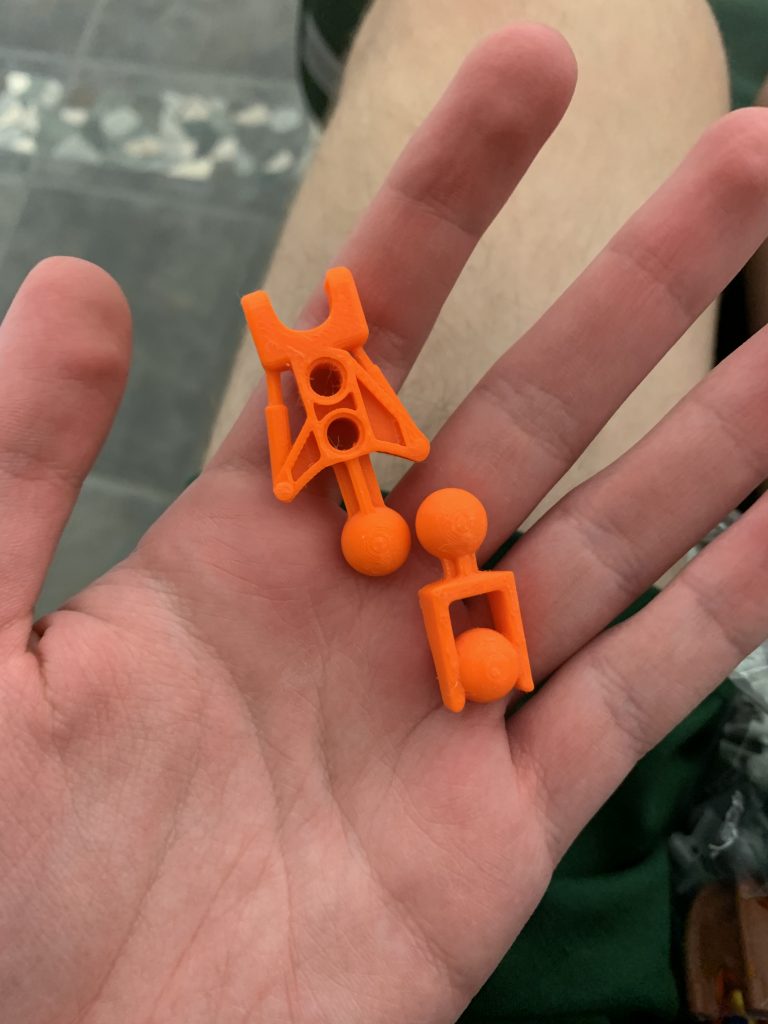
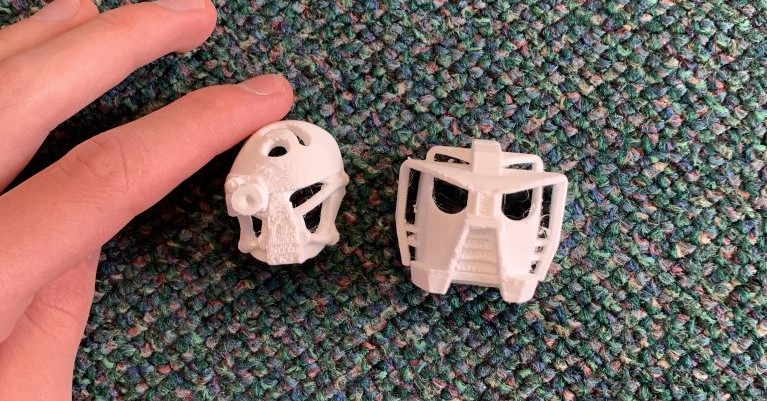
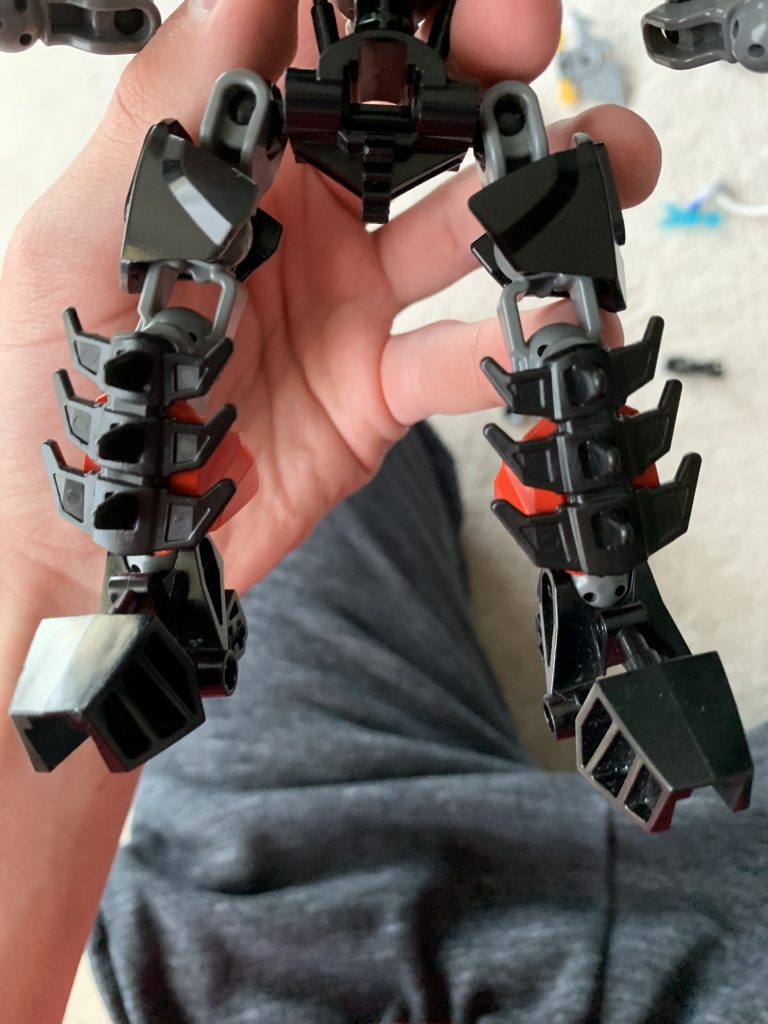
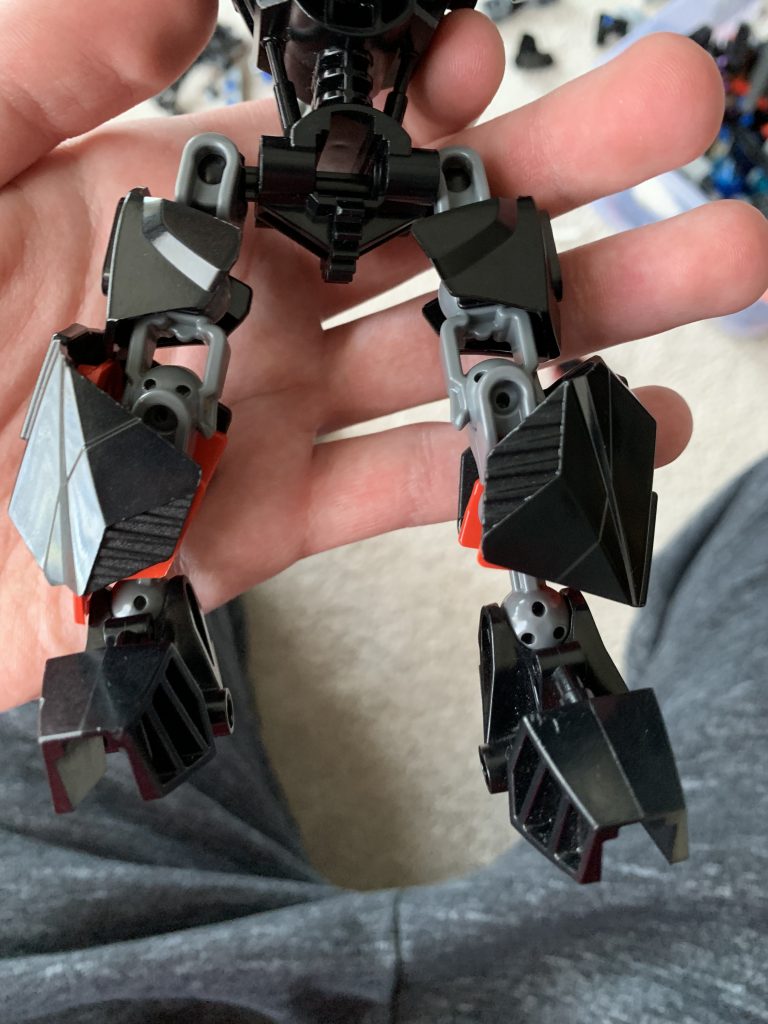
These are photos of the designs for the modified limbs. These would not only improve articulation and possability to the toa mata, but by using CCBS joints and the custom upper arm, special armor can be attached while retaining a more familiar design. The first sucsessful implimentation was Kopaka, as seen directly above. Some refinements would be made to the legs later
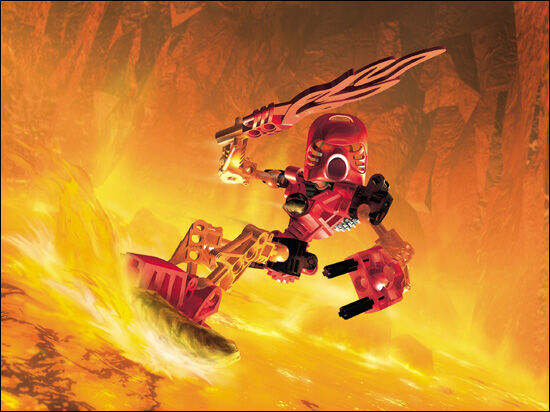


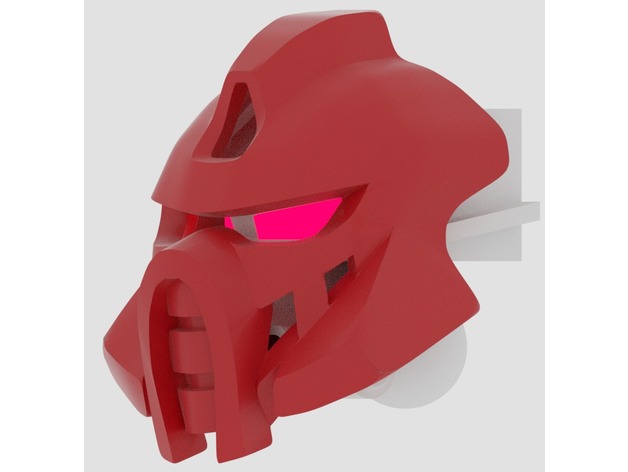

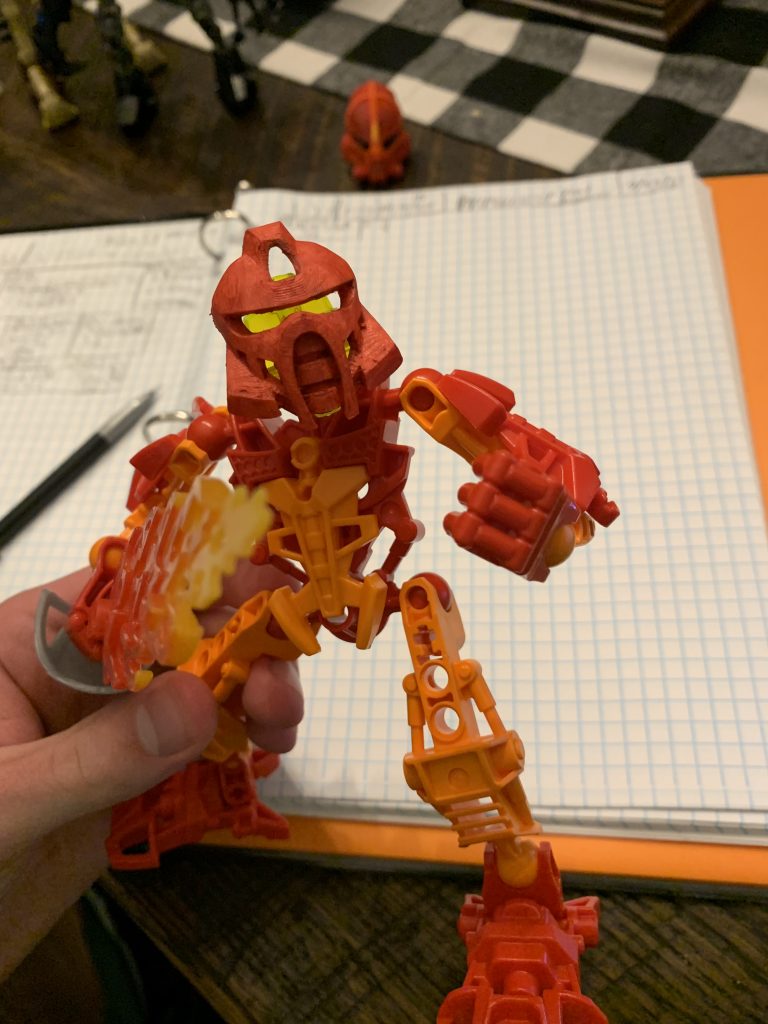
Tahu is the toa of fire, and wears the Kanohi Hau, mask of shielding. He is presenting unique challenges when it comes to the limbs. They dont make the modular peices in orange, so I have to find work arounds. In the future, I may be able to print orange bones. As for now however, the 2008 form is (in my opinion) actually one of the better Mistika transitions, with only the mask being the problem. To solve this, I used KhingK’s Noble Hau Model on Thingverse. Though it was designed as a less powerfu version of the Hau, it incorperated design elements from the base Hau, Nuva form, and even bits from the base 2008 mask. It kinda makes a nice interpertation of a adaptive Hau. When I 3d printed it, it was yellow. When I initialy went to test it out, the axle snaped, and i had to glue it back on. It now sits slightly crooked, but still looks decent with the red paint.


Pohatu is a Toa of speed, wearer of the Kakama, the mask of speed. Pohatu Mata is completely unmodified. He shares a problem with Tahu, as they dont make the official bone peices in tan. Also, the 2008 Phantoka form is diffrent colors than the base form. Those colors and the base design were actually pretty cool, but didn’t have mutch cohesion with the previous forms. For the mask, I used Galva’s Adaptive Kakama (Flight) modle from Thingverse. This more resembled The Kakama nuva, while having the cheek vent things of the normal mask. This one could also fit a visor underneath. I printed this in orange and tried to initaly paint it woith a normal brown that turned out too dark. Because of this, I decided to go with a more red brown color, to more successful results. It even fits the mata head peice.
From the same print as The Adaptive Kakama Nuva, these are limbs designed after the Toa mata limbs, similar save for the knee/arm joint. It worked pretty well, but it presented the problem of retaining the same flawed hip and sholder joints. It still is pretty cool though, and I may find a use for these peices in the future.

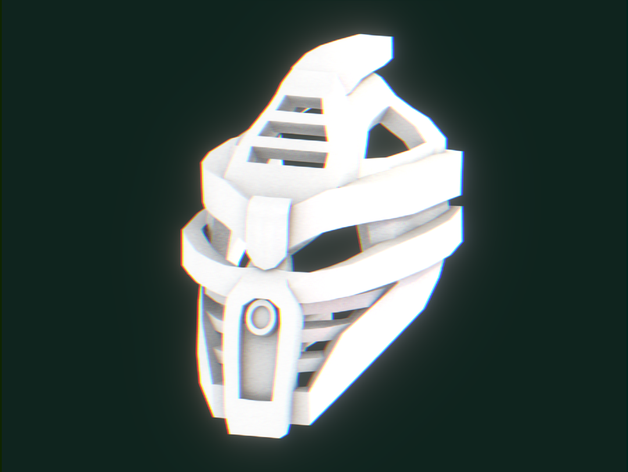


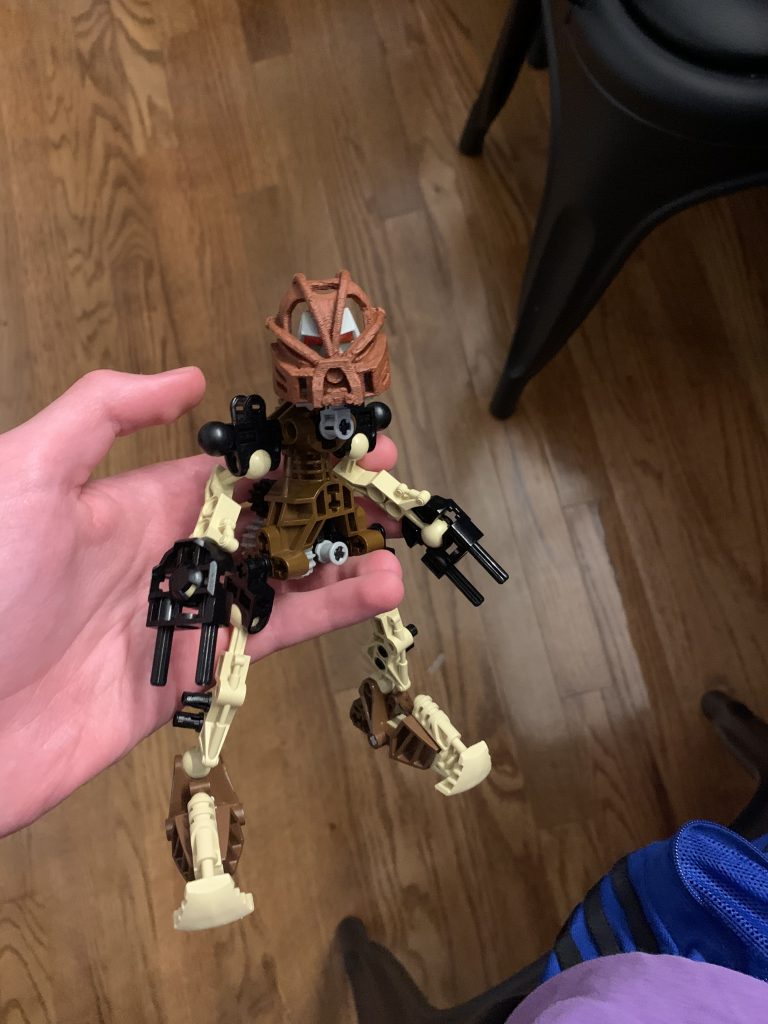
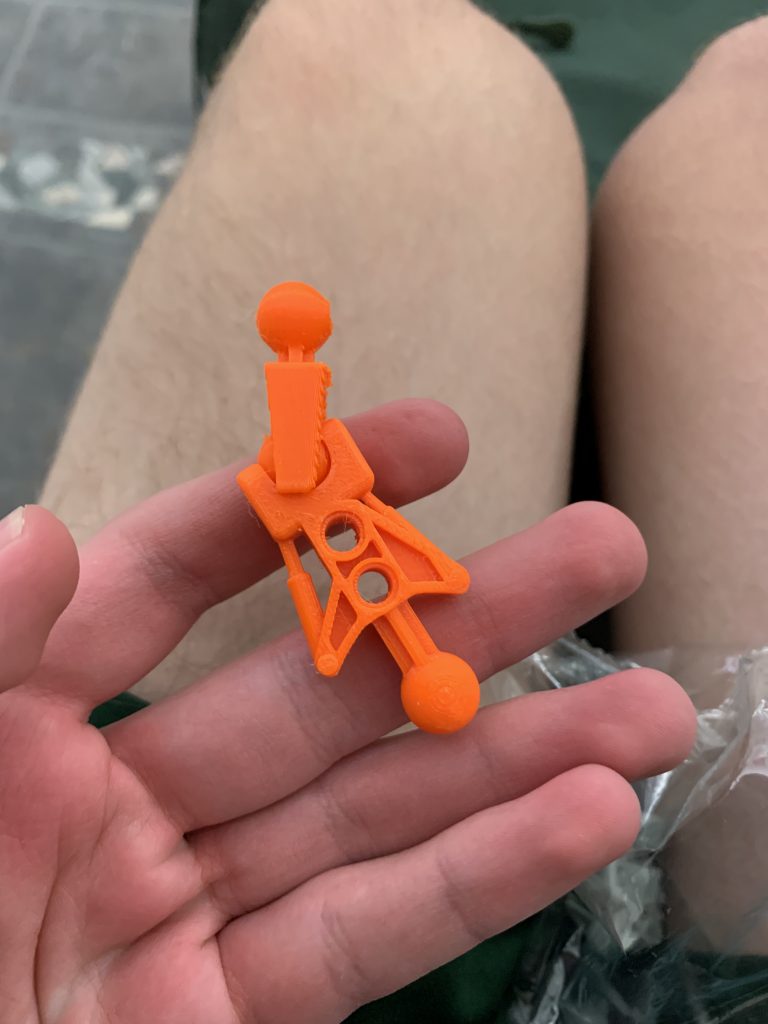
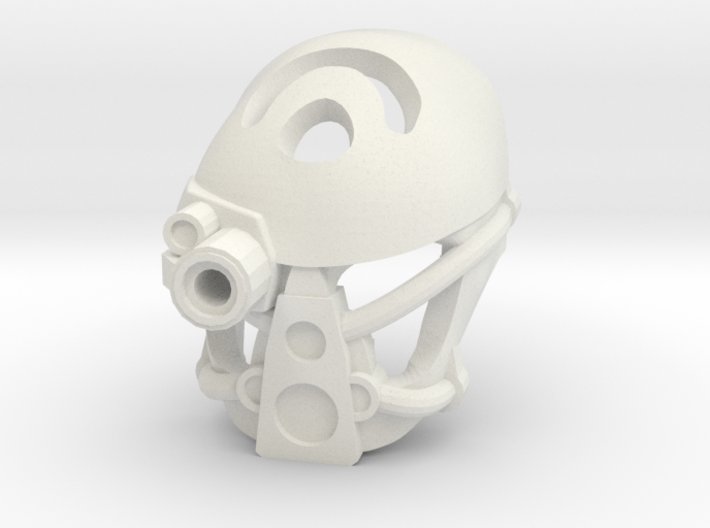
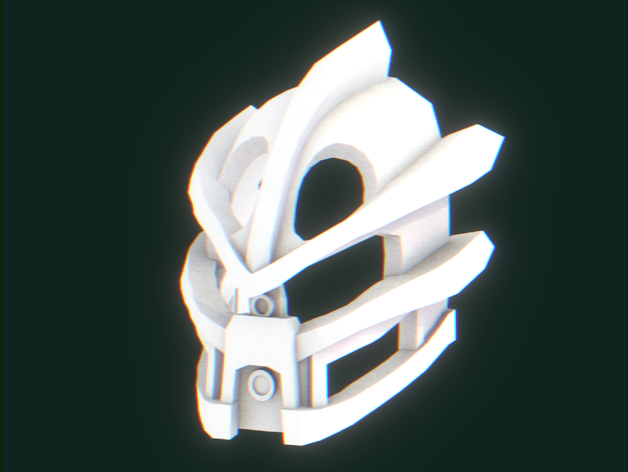
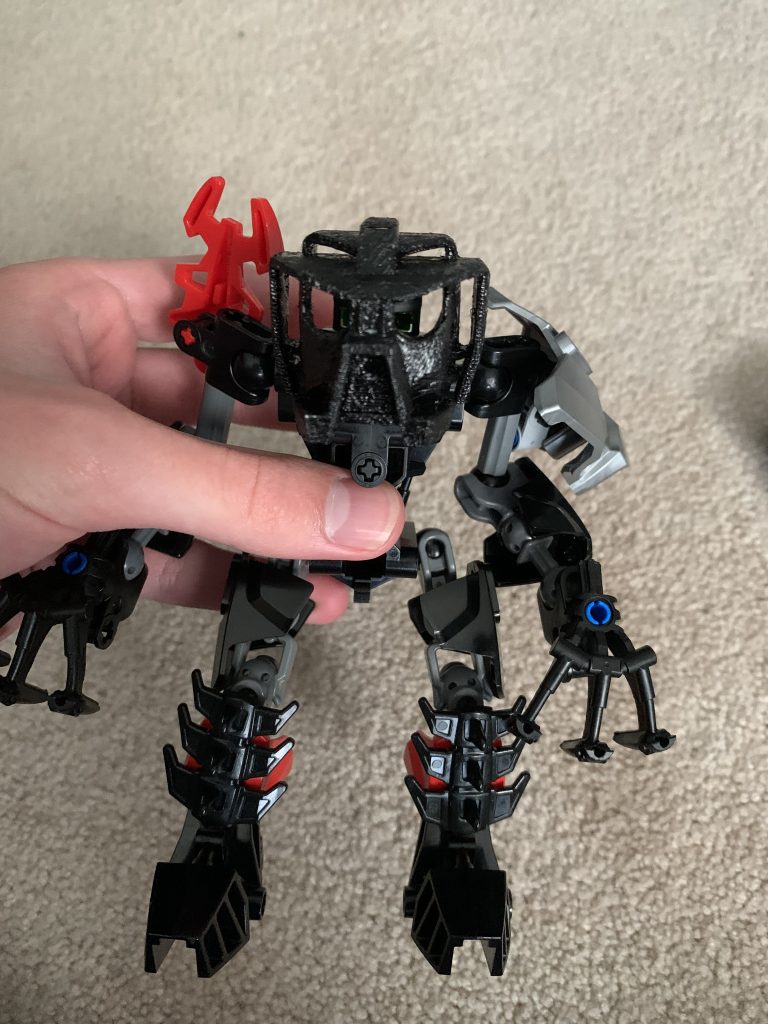
By far the most realised version of this project, Onua is the toa of Earth. His mask is the Pakari, the mask of stregnth. He was the second and currently the only other to recieved the modified limbs other than Kopaka. Onua has the second version of the modified limbs, now fully modular and able to recieve the upgrade parts. For the mask, I was going to go with The Sky Adapted Pakari by Galva, but thought the Project Nuva Pakari by Rothanak would be a better fit fo a Toa Nuva based form like the Mistika form was supposed to be. The mask wasnt origionaly scaled properly, so I had to do that myself. The mask was first printed in white plastic, and Using some paint at home and a pipecleaner, I managed to paint the entire mask Black. I also descovered i had most of the parts to emulate a mostly complete Mistika form, so I experimented until I achieved the results seen above. While not perfect, this is a really cool thing to have built.


Kopaka is a Toa of Ice, and wears the Akaku, mask of X ray vission. Kopaka’s Phantoka mask is Galva’s Flight adapted Akaku. I chose this as supposedly, it actually works with the lazer peice. However, a drill bit is needed for modification on this print. This was printed at the same time as the Project Nuva Pakari, hence why the both started out white. However, no color change was needed for this mask, as that is Kopaka’s base color.

It took a week to print Lewa and Gali’s masks. To start with, I decided to move to the other printer, so I had to learn how to use that. Then, the printers were acting a bit funny, so I had to restart the print three times before it actually started to print the masks properly. I also printed a neck joint adapter because the masks seemed to work best with metru heads. In the end, it ended up working


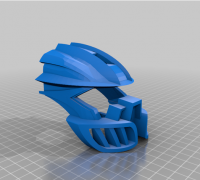
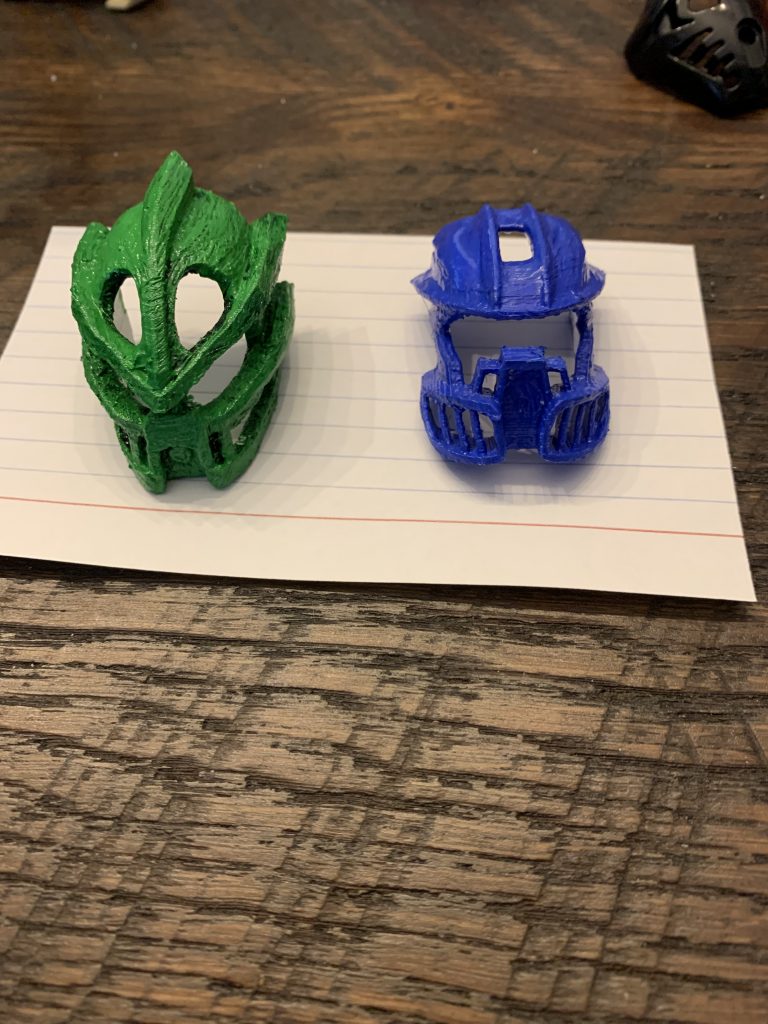

Gali is the Toa of Water. She wears the Kaukau, mask of waterbreathing. Gali Mata is completely unmodified. The mask choise was a toss up between the Galva model and the Rothanak model. The Galva model had compatability with the head fins on the 2008 mask, but the Rothanak version more closely resembled the Kaukau Nuva. Both could use the visor peice. In the end, I ended up going with the Rothanak model. Similar to Rothanak’s Pakari Nuva, I had to scale the model myself, though im not sure I did it quite right. It may work better with Metru heads. The printing process was its own mess that was covered earlier. When it did print, the axle sheered clean off upon initial testing with a metru head. After modifiying the axle and re-glueing it, it seemes to funtion. I painted the mask at home using a mix of a dark and light blue, as for some reason I dont have a base blue paint. In the end it worked out pretty well., though it only really fits on a metru head, meaning later extensive modification may be neccisary.


I dont actually have Lewa, but I know the exact modifications I need to make to make him work. Lewa is the Toa of Air. His mask is the Miru, mask of levetation. The mask used was Galva’s Flight Adapted Miru and is compatibe with a visor peice. It was printed along side Gali’s mask. After getting stuck in a Metru head, I trimed the axle so that it would be easier to remove and put on. It dosn’t fit on Mata heads, so more modifications will be needed later to make a Mata body work with a Metru head. Also, it may be an issue to find four lime ccbs bones for the forearms/shins if the trans-neon green colors dont work.

Cronologicly, this is the point at wich I started on the Mistika form for Onua. A Hero Factory torso shell scaled better than the actual shield seemed to, so I used that instead. I initialy didnt know how to construct the legs with the thrusters on the cack and the armor on the fron at the same time, but then i decided to use the spike peice over a size two shell to reach a cool effect like there are verniers under the spiked shins. I am still working on the shield and sholder fins, but as of right now, it looks really cool and very simillar to what the finished project will be.


In the future, more modifications will need to be made to make the 2008 armor work. however with the upper arm designs and ccbs bones, this should be easier/more effective to do. Some designs like Kopaka and Tahu’s will require some more intresting solutions than than just applying armor.


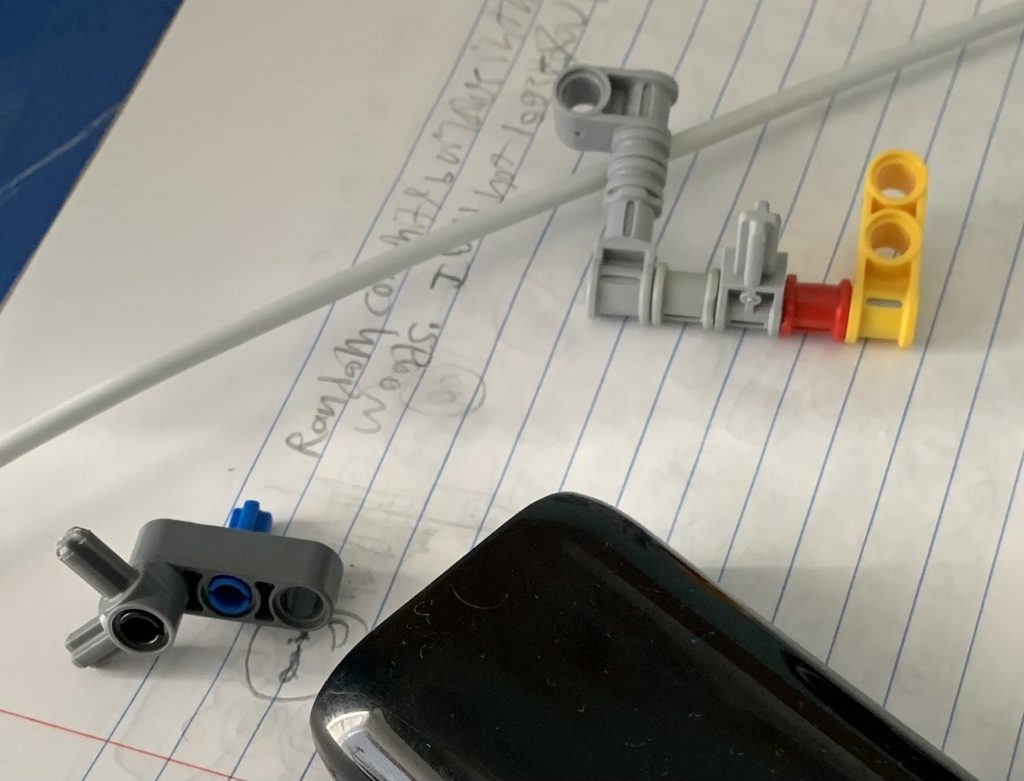
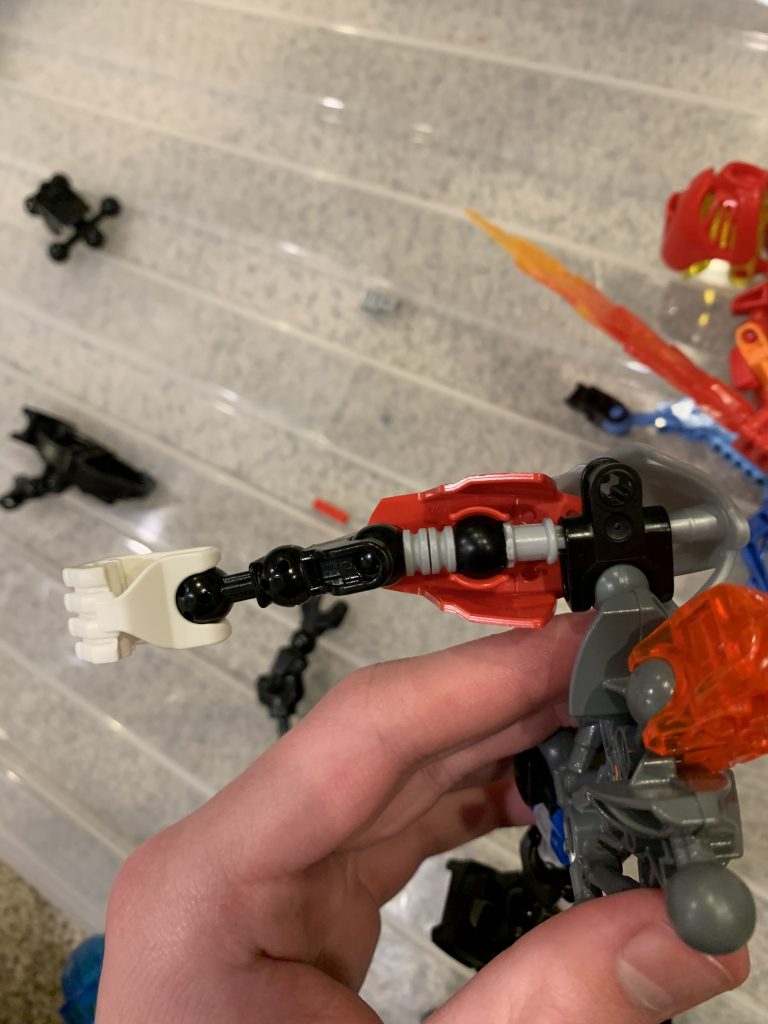
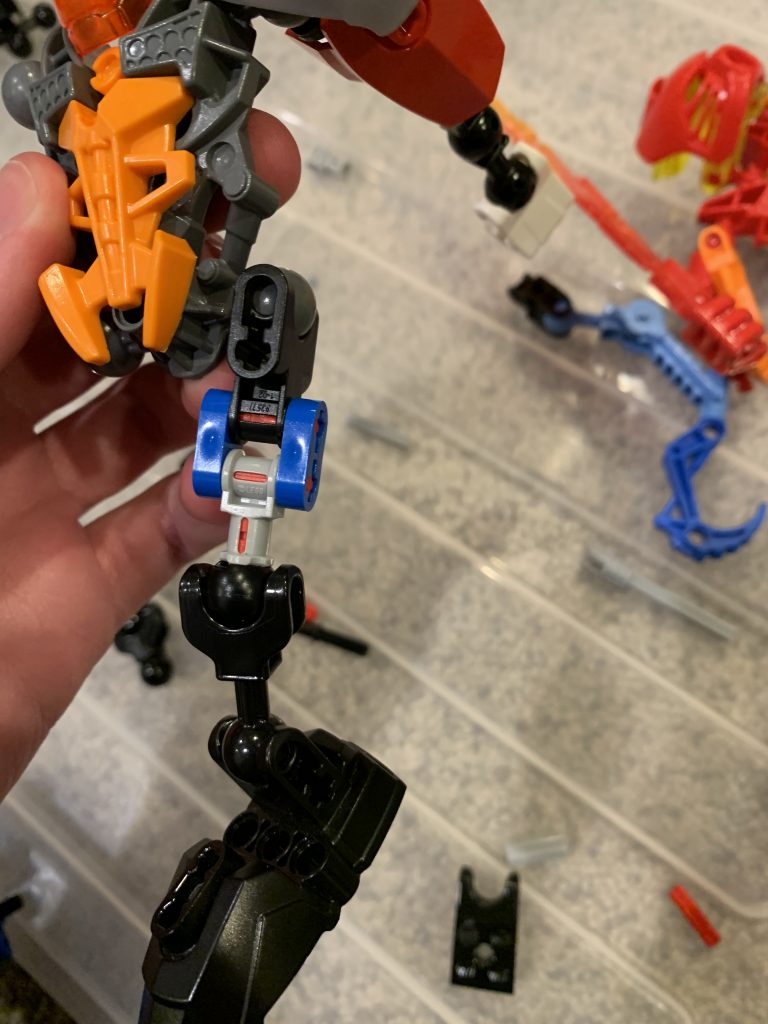
On the left, there is the vernier backpack. If you put the blue axle pin where the gear stopper usually goes, you will be able to attach Tahu Mistika’s Vernier backpack. At least, this is how I would like it to work, but i dont have all of the peices to test this yet. On the right, there is Kopaka’s wing backpack. It attaches the same way as Tahu’s backpack, but has extensions to attach Kopaka Phantoka’s wings using pins so they can move into and out of position. The pin holes can also be replaced with ball joints for the extra shells that I 3d printed.

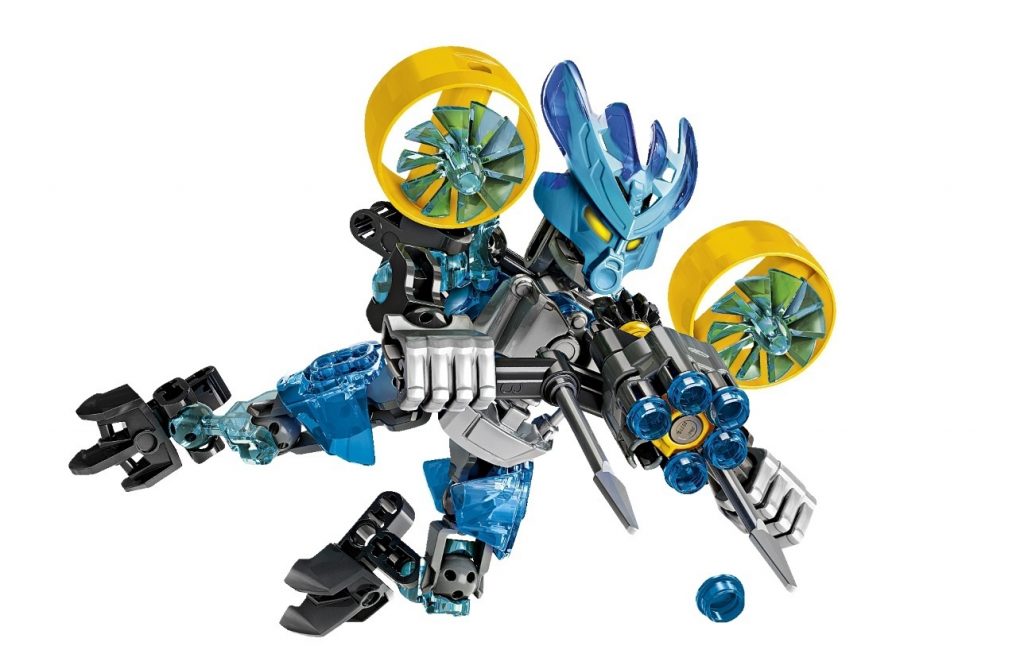
This is the most recent development in this project. what if instead of some sholder spikes, Gali’s Mistika form had Turbines/propellers similar to the Protector of water pictured directly above? More developments could come from this but this is as far as the idea has progressed at this point.

The Toa Mata could combine into two super powered beings using only the peices included in the sets. I dont know if it is possible, but when completed, maybe that would work with the modified toa mata as well?
Thats all I have for now. More updates to follow!
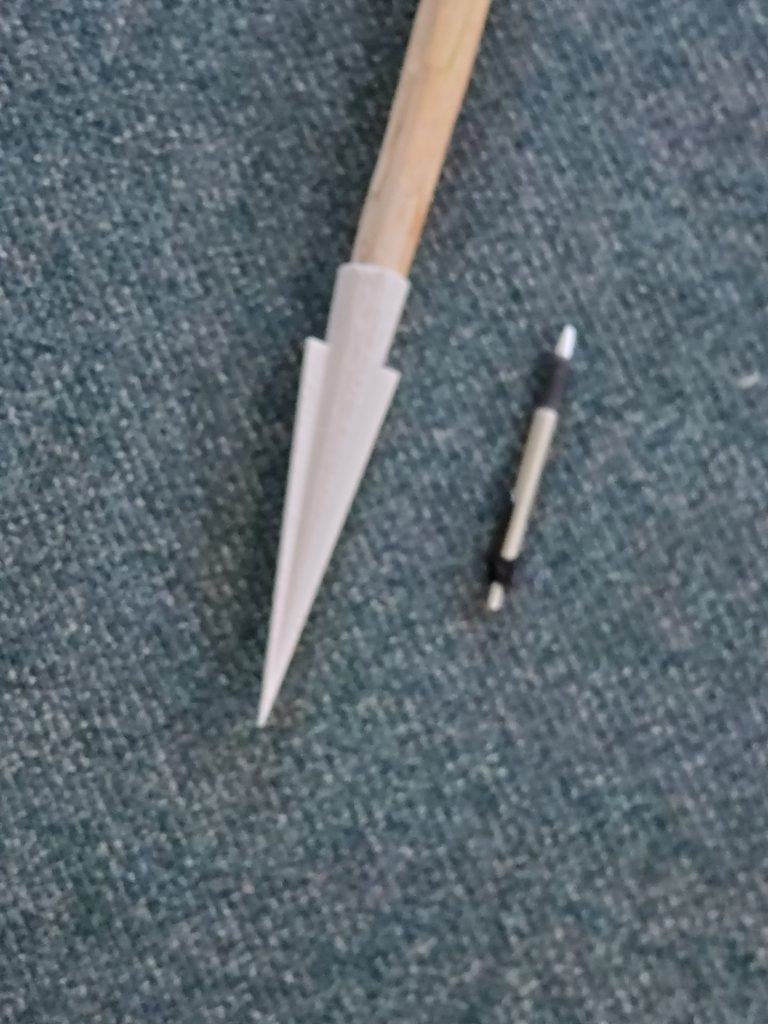
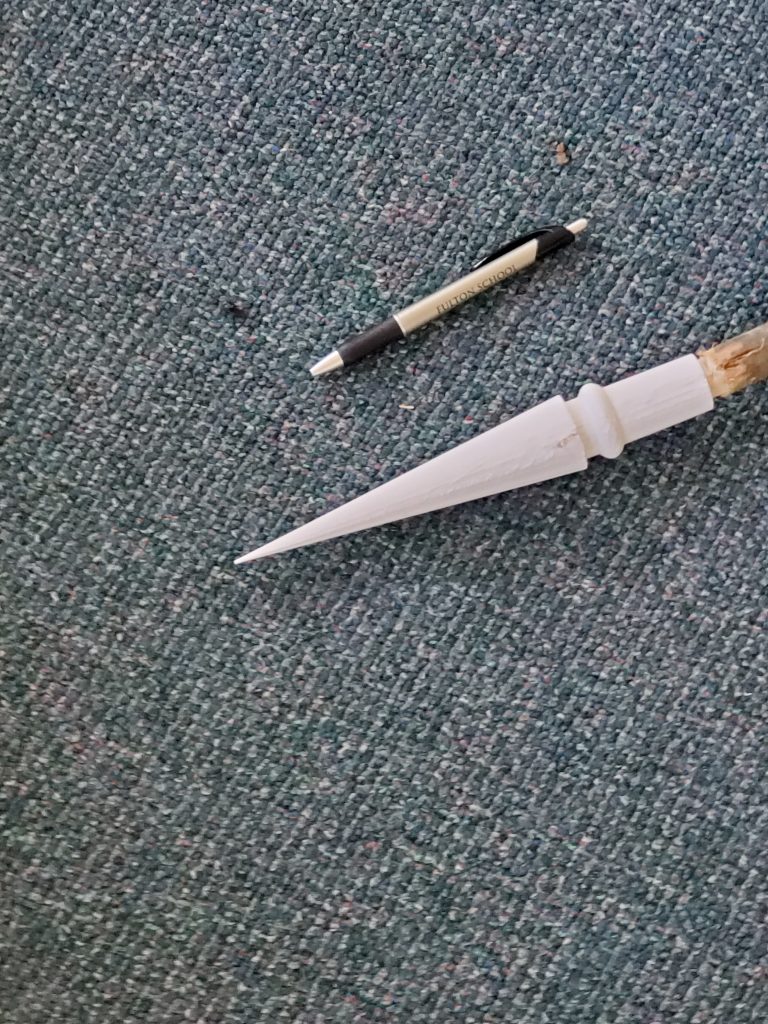
Ancient Greek Spear (Dory)
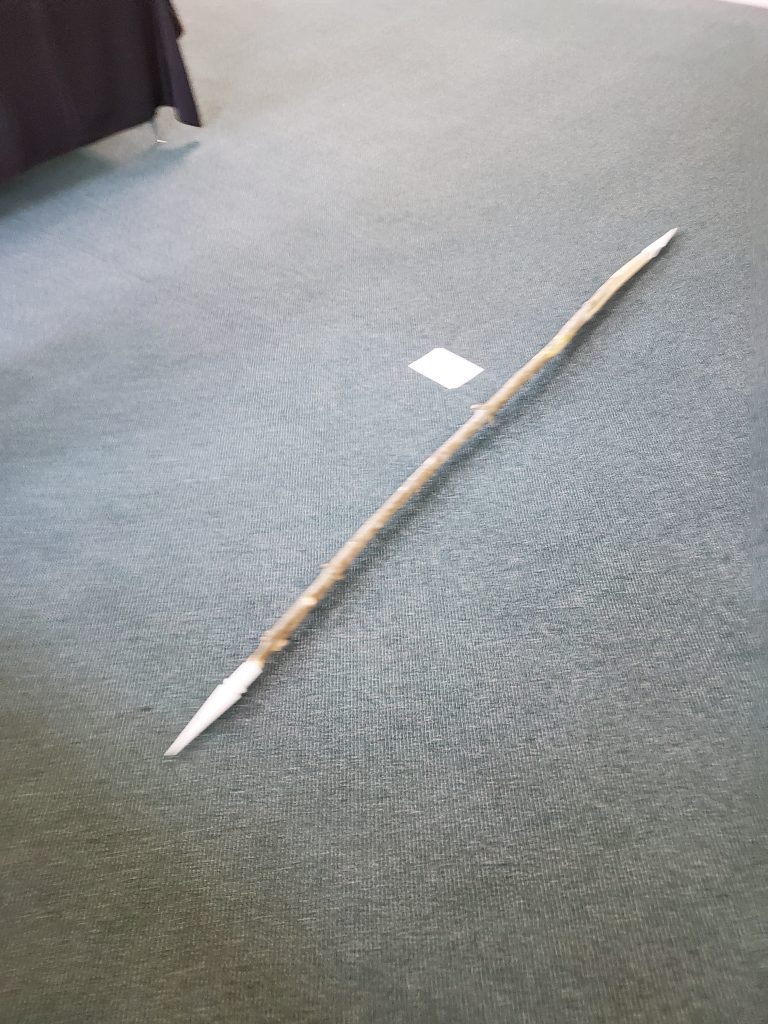
The Ancient Greek Spear known as the dory was one of the most essential weapons for the Greeks. The type of soldier who used this spear was known as the Hoplite, which is a class of soldier in the army. These warriors were citizen warriors who made their Dory themselves.
The spear typically had a wooden shaft with a metal butt and head; the head being for stabbing and the butt for staking into the ground. These were made of bronze or iron as they were the main resources at the time.
To make the spear, I used the 3D printer to make both ends looking off examples from IronGateArmory and designing them with OpenScad. Through OpenScad, I had to combine shapes like prisms, which I found from RichardBronosky’s GitHub Repository. The ends weren’t exact to size due to the available printing size (around 50%). The wood was made of Ash Wood cut down from the slope outside of school.
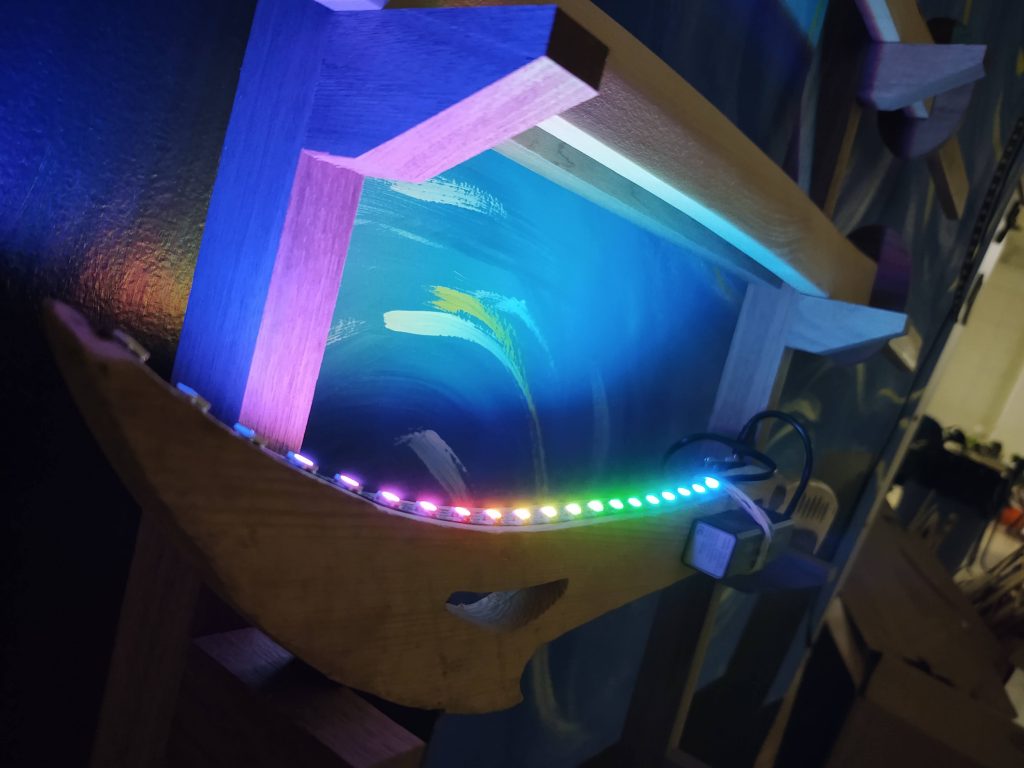
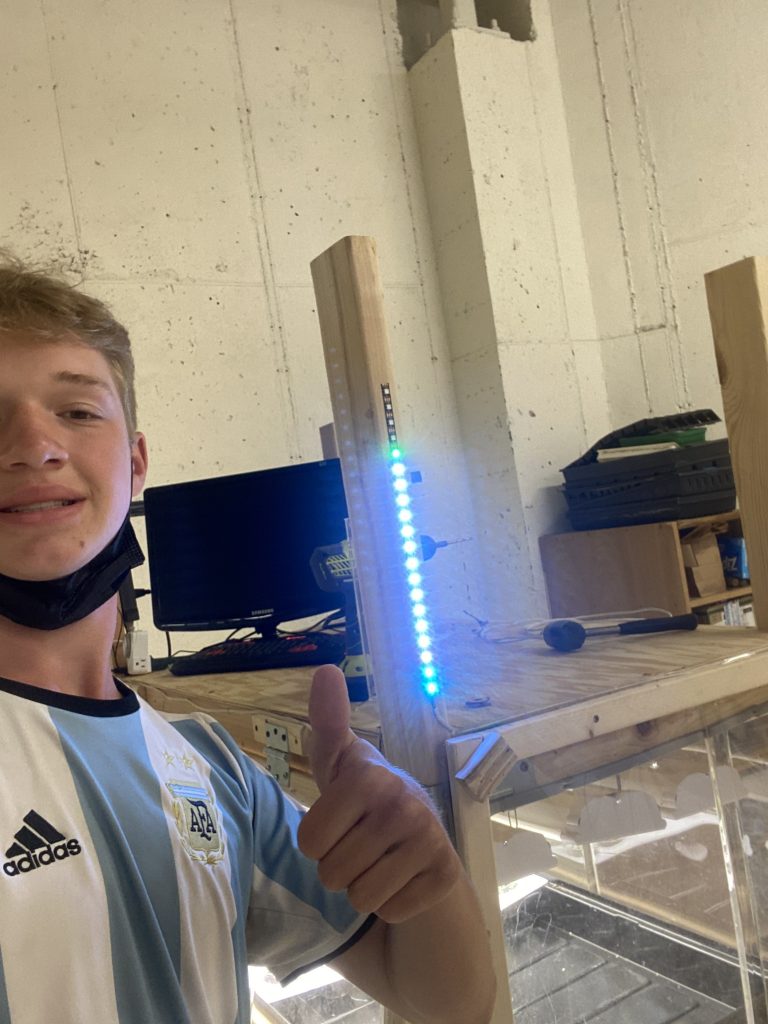
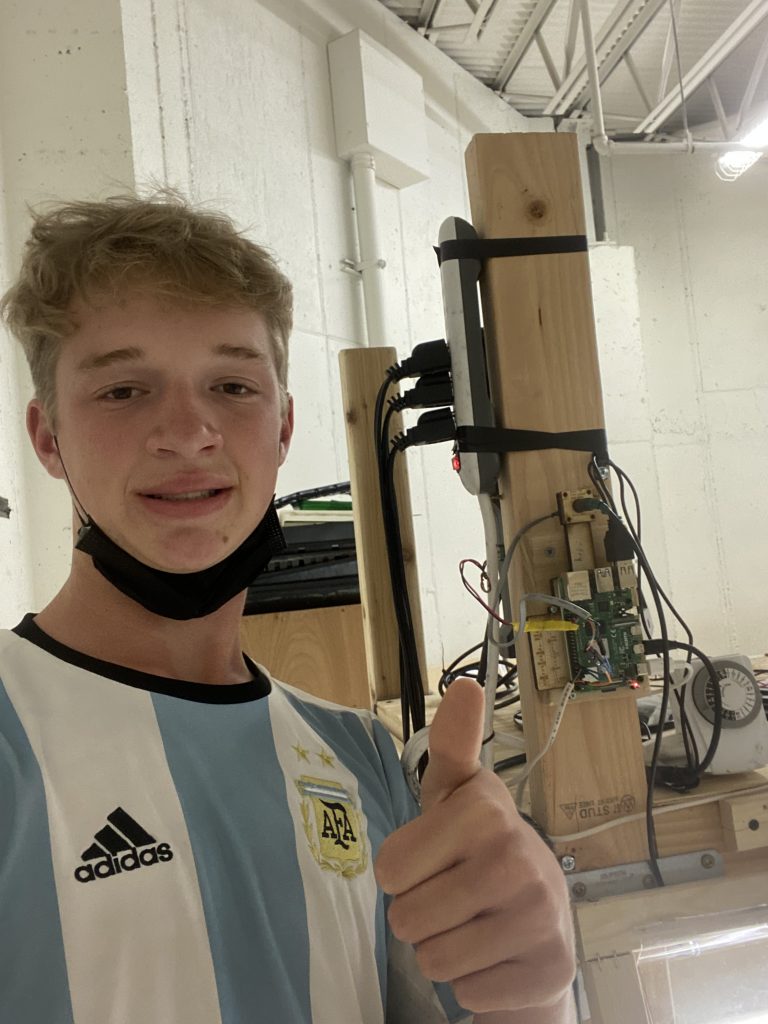
LED Sword
In this project, I used an old sword I had made using a CNC machine(A machine that cuts large pieces of certain materials controlled by a computer), as well as an LED strip attached to a Raspberry Pi, to learn how to program the Pi. The purpose for doing this is experiment is to be able to learn the different ways that it is possible to light the LEDs across the strip.
First, I had to find the place on the wood to be able to fit the strip as well as a Raspberry Pi and a battery. First, I used some wood and some screws to hold the Pi in place. Next, I cut the LEDs to the amount I wanted. To attach the LEDs I had to strip the wires so that they were able fit into pins which then were attached to the Pi. To add the power source I put a rechargeable battery by the handle using rubber bands. Lastly, I connected to the Raspberry Pi continued working on the programs for the strip.
I was able to learn more about the structure of LED strips and how they can be used to experiment in ways that are beneficial to learning coding.
https://github.com/Blas-U/geometry-
Keychain Thing
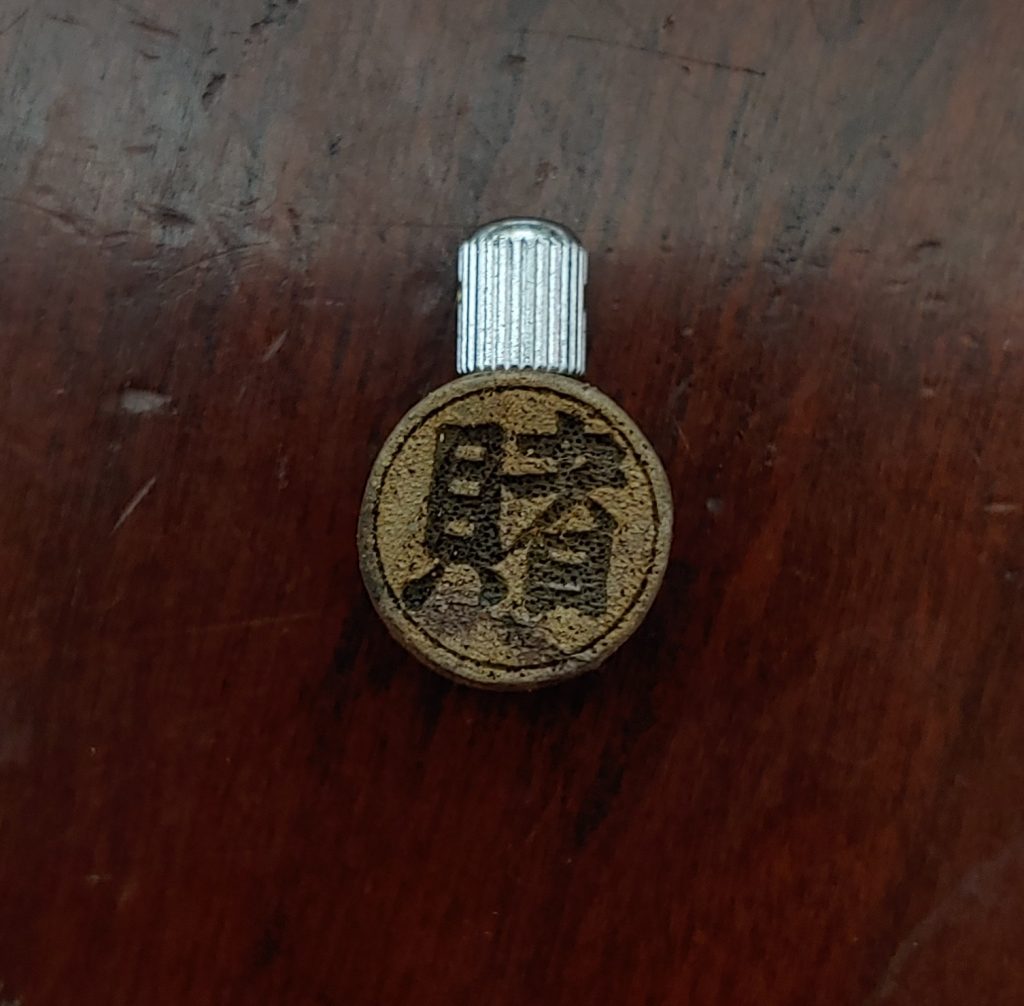
This is a key chain that I made from fancy wood that I got from Dr. Urbano. First, I took the Japanese character from Google and outlined traced it. Then I overlapped the traced image over the original and shaped it to match the original (because it was slightly off from the outline). Then, I took off the access material using the sander. This part took a little time because I had to eyeball the thickness and try to make a perfect circle around the character.
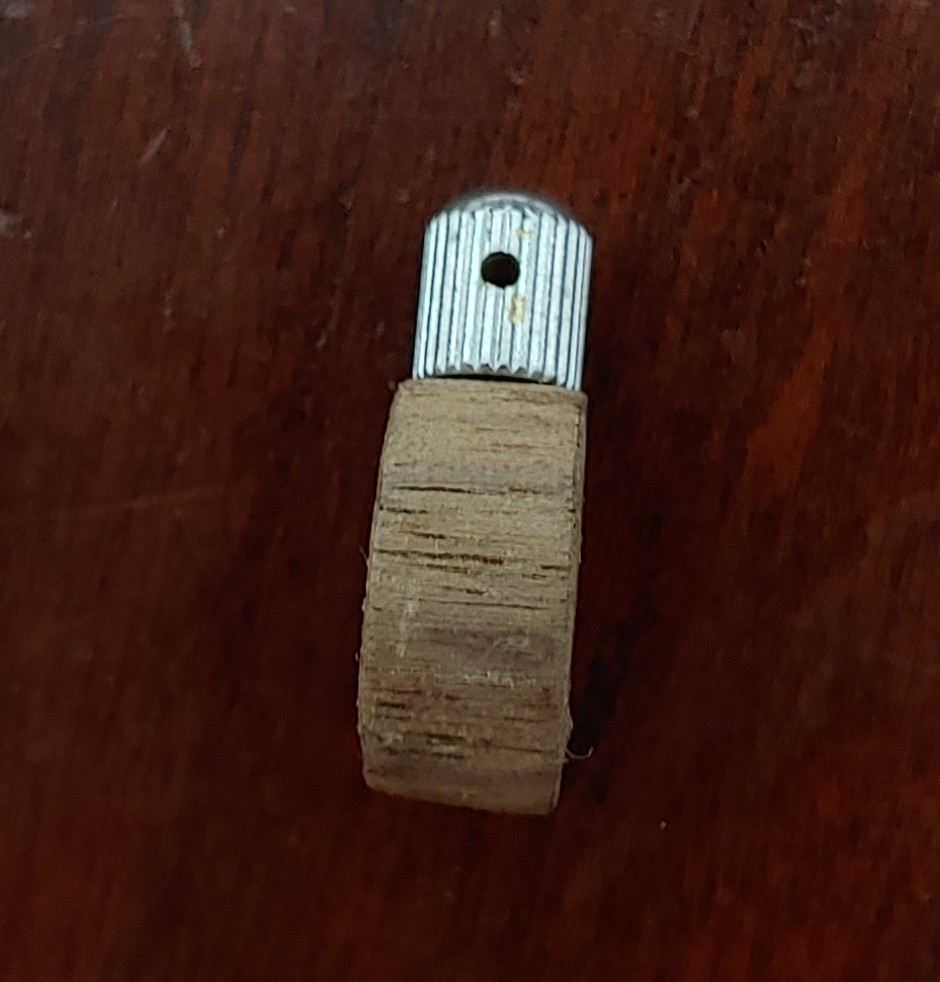
For the metal piece on top I used a screw thing I found in the laser/vinyl cutting room. I then drilled a hole through it using the drill press. I had to put the metal screw in a clamp and then firmly hold it on the drill press plate. I drilled the hole with a very small drill pit for a pilot hole and then I used a larger one.
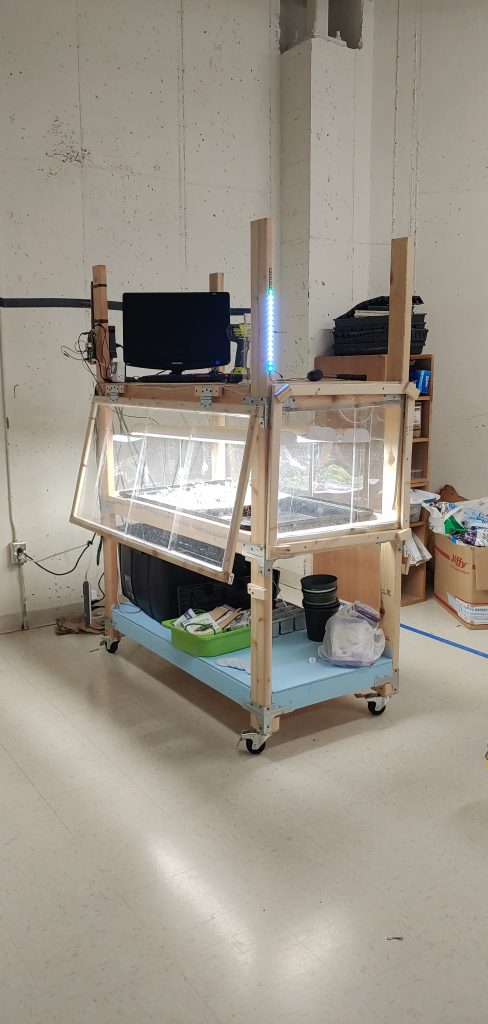
Hydroponics Tower
For this project the main things I did were help design and build the actual structure of the hydroponics tower and code the programs that run the pumps and the LEDs that run with them. I spent the majority of the time making multiple different programs that all do slightly different things with the pumps. One program runs the pumps on a daily cycle while the other makes it so you can turn the pumps on for a specified duration from a local website of the command line. I did not set up the website but I created the python program that ran the action communicated for the website.
The LED program went pretty well. I thought it was a lot of fun to make the LEDs dance up and down the strip. I spent a lot of time (probably too much) trying to make the LED colors make a cool pattern while it pumped. Running the pumps themselves also went pretty well.
The list of things that did not go well is actually shorter than expected. The main problems were little errors in the code that would take a long time to sniff out. The only one of those that is still a problem at the moment is one that makes all the lights go bright white after a keyboard interrupt or other error. We couldn’t figure out what was causing this and it doesn’t actually mess any of the core functions up so we are leaving it for now.
I learned a lot about python and the job specific functions that we needed to use but the more important things I learned were just the broader skills involved with a big project like this. The first was how quick I have gotten with the basic commands in terminal. I’m sure this will apply to other programing projects in the future and I feel like I’ve become much more proficient with it. The other thing was how good I got at looking up styling and other things online to the point where I was able to teach myself a lot of concepts. This pretty much tears down any boundaries that exist because I can now teach myself most things I will need to know for future projects.
I probably would’ve tried to spend more time trying to solve my problems instead of waiting for the teacher to help me everytime. Early on in the project, anytime my code gave my an error message I would just get annoyed and wait for my teacher to help me fix it. As it went on, I got better at fixing my errors by inspecting my code and by googling syntax for the language I was using. Even though I still needed my teacher for some things, I was able to solve most of my problems on my own.
Hydroponics System
For this project I created a fully functional hydroponics system with the ability to connect and control the pumps from your device.
The hydroponics system has a lot of advantages over the traditional greenhouse. Some advantages are the sturdiness of the frame, accessibility of the raspberry pi, the simplicity of the website, and the functionality of the entire system.
I believe that the coding that went into this project went more or less smoothly. I can confidently look at most of the code and have the ability to explain what is happening and how to tell when it is working or not. I am very confident in running each program and being able to recognize when it is functioning properly or not.
There were a couple of things that I personally struggled with during this project. One of which was trying to get the pump time to function properly with the server.py file. I definitely could not have done it without Dr. Urbano’s help.
I have learned a lot more about how the html, javascrpit, and the server works together.
I would probably focus more on the aesthetics of the website. Although it is functioning it is not pretty to look at. It is literally the bare bones and could use some styling.
Allison’s Hang board

I spent all of the fall and winter working on this project. I decided to created a hang board, which is used for rock climbing training. It is a piece of wood with different depths in it that you hang from and it trains your finger strength. I first cut the length of the piece of wood I wanted to use. I then began to design the depths of the slots for the CNC machine to cut out. I started my design on Corel and then moved it to the Easel program so I could then add the depth of the slots, this took a few weeks. I then was ready for the CNC machine to make the cuts. This took 2 months to cut in total. I ran into very many problems with the CNC machine and kept having to adjust my settings and start the cuts over. The CNC machine also doesn’t cut very fast. At the beginning of this project I was thinking this would take a week or two at max, but I was very wrong. This was a project full of trail and errors and figuring out the best way to do things.
Recent Comments