Tri State Area
Makerspace at the Fulton School
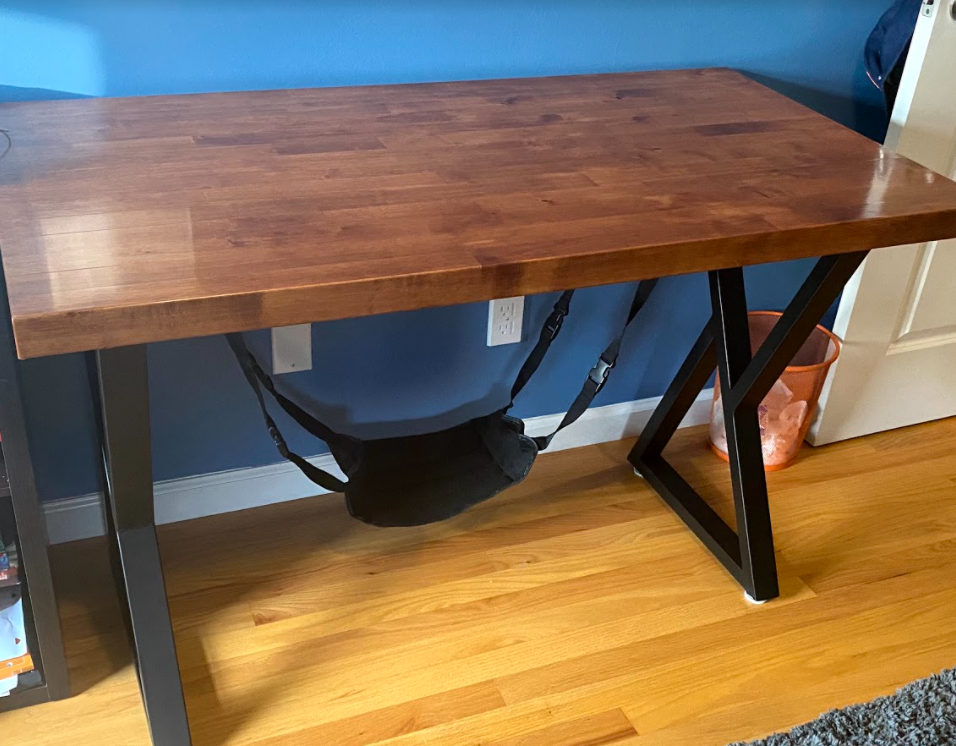
Table
When I started to do online learning for this year I built a table. I built this table because the previous table that I had was not good for online learning. I wanted this table to have some style to it so I looked on the internet trying to find legs that had some style to them. I first found some legs that I liked but they ended up being out of stock, so I had to look again and ended up with these legs with two triangles conected to each other. I bought a butcher block table top and sanded it down. I spent time trying out different stains to get a stain that I like and ended up with this shade of brown for the stain. The attachment on the bottem of the table is a foot hammock that I take off sometimes. I like how it turned out.
The Wall of Maker Space
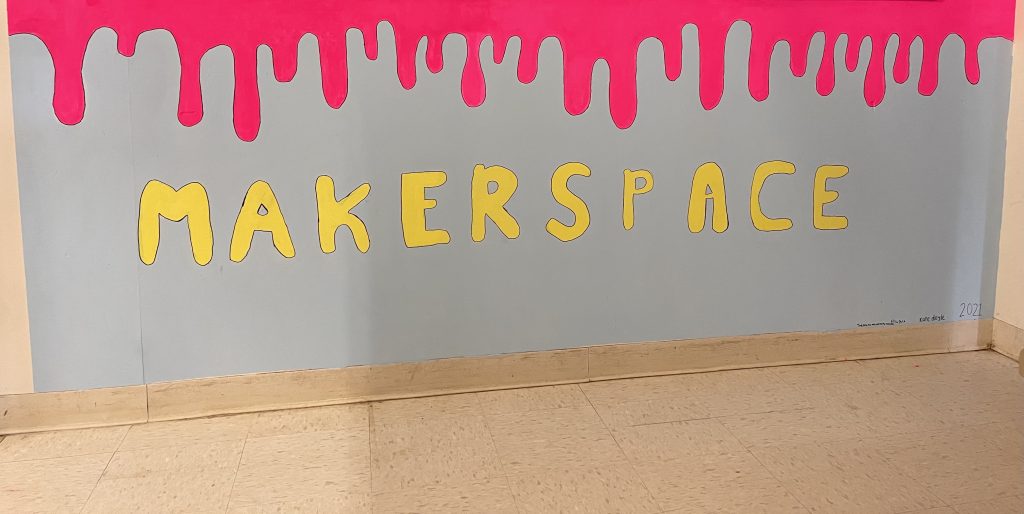
One project that took a majority of the last quarter was the wall that Ella, Alex, Kate, and I painted. First we lined the walls with blue tape to keep the painted space well contained. Second, we painted the wall with blue paint we got from the art room. We looked at pictures for inspiration and then decided to make an outline. We drew the word “Makerspace” across the wall in bubble letters. Then we drew drips along the top. After everything was outlined we began to paint.
We painted the letters with yellow acrylic paint. After the letters we painted the drips with bright pink acrylic paint. The painting took a long time, especially since things didn’t dry very evenly. We had to do multiple coats on the pink drips. Once we were finished we outlined the letters and drips using a black paint pen. Overall the painting process took the longest and multiple coats were needed.
Everything generally went very well. Next time I would get better paint like the blue that we used. I would also be sure to get paint pens at the beginning. We had to wait a little bit before being able to do the outline. Next time I’ll be more prepared with my materials. With this knowledge things will go much more smoothly for future projects.
The wall of Maker space (drip my drip)
Overall this year has been a good maker space year one of the project was cleaning the entrance to the tri state area of the maker space I did this project with Ella,Kate and Lizzie we cleaned out the maker space we took trash from places it didn’t belong we organized drawers etc.
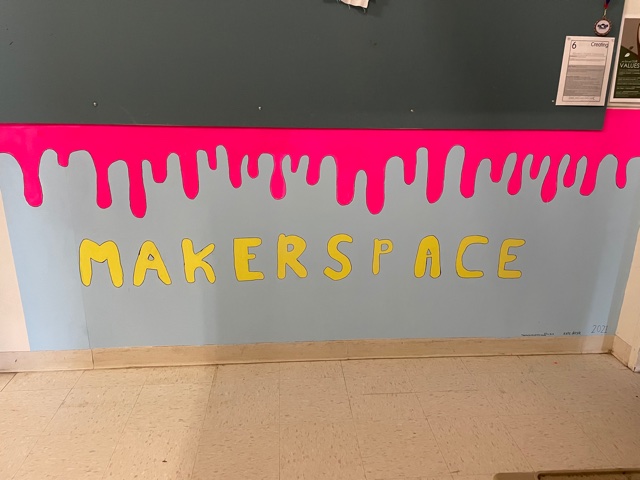
We than moved on to another project which was to paint a meaningful word or phrase so we chose the would obviously maker space in sunny yellow color and the drips in hot pink color we couldn’t decide at first which color shade of blue to do for the background so we decided on a baby blue color. We also decided a font for the word maker space and that was bubble letters. This year has been a great year to do maker space as an elective because you can not only can you do what you want but to express all, your feelings through art through this rough time.
Makerspace Wall Art
For my fourth quarter makerspace project Kate, Alex, Lizzie, and I decided to paint the wall next to the entrance of the Tri State Area. We painted the wall light blue, with pink drips, and the word “MAKERSPACE” in yellow paint. The blue paint is wall paint and the pink and yellow paint are acrylic. This project took a couple of weeks for us to finish. The first step was drawing the drips and letters out in pencil. Then we painted the background, then the drips, and letters. We went over each color a couple of times and did touch ups on places we missed while painting. Lastly we took a black paint marker and outlined the drips and letters. Something that went well during this project was the actual painting of everything, once we had colors and design sorted out the actual painting was very easy and relaxing to work on. A challenge that we ran into was that everyday we would have to remix the pink and yellow paints to get the right shade from the previous day but, overall this was easy to resolve. I really enjoyed doing this project and I would really enjoy doing another painting in the future.

LED Light Strip Project
This quarter, I have worked on programming and developing a LED light strip, using raspberry pi. Throughout the process I have learned much about coding and prgramming, and mulitple occurances throughout the process made this experience more informative. For example, when running through issues on my computer, I found places that I could fix, things to make it and the raspberry pi work better, and so forth. Especially the breakdowns on the raspberry pi itself; now I feel that I understand what it is and how it works in much more detail. The procedure went like so: First, I read through the instrutcions for the coding and programming listed, and made sure that I understood each step- so I didn’t mess up anything in the base of the code. Next, the programming process begun, and there are multiple progams now set up on my computer- including the webpage to control the lights. Next, I’ll be working on a better-designed piece of wood to put my LED strip on.
Wall Mural

For my fourth quarter makerspace project, we decided to paint a mural on one of the walls in makerspace. The first thing that we did was brainstorm on a piece of paper what we wanted to paint on the wall. Next, we started drawing our sketch of the design on the blank wall. After we had the design sketched out on the wall, we started looking for paint. None of us were able to go to the store to buy paint at the time that we wanted to paint, so we just used whatever paint in the colors that we could find at school. If we were to do this again, I think that we would probably go to the store and buy the paint so that we could have whatever color choices we wanted, instead of being limited to the colors that were in the school. After we decided on the colors to use, we started painting. It took us several days to all of the painting because it took time to paint the words and the entire background using fairly small paintbrushes. After we were done painting, we decided that it would look better if we were able to make it pop a little bit. To do this, we outlined the drips and the letters with a black paint marker. One issue that we ran into while doing this was that the marker didn’t work very well on top of paint that goes on the wall. Something that may have helped us would be to research what kind of paint pens work best on top of wall paint. I think that it turned out very well, and I think that we are all happy with the result of the project.
Hydroponic system
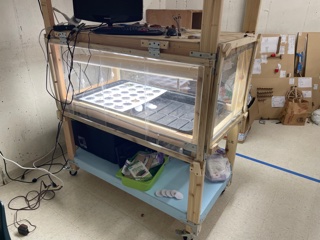
For my maker space project I have been working on a hydroponic system. This hydroponic system has many features, like how it is mobil, how it has lights attached to it, how its structure was built with wood, how it can give enough water to the plants, and many more features. My classmates and I had worked on this for our environmental science class to help create and indoor system which could help grow plants on their own. My job in helping to build the hydroponic system was mainly focused on the structure of it. I did a lot of drilling, cutting, nailing, stapling, measuring, and taping.
During this project thing that I think went well was the actual design of the Hydroponic system. I think its great how we designed it to be mobil, I think it’s great how its easy access to the plants, and the other thing that I like is that if we decided to throw on another set of plants we could do it. I think we made a very strong design that has many great features.
I think the overall biggest challenge while building the hydroponic system was that some of the measurements were off and that we had to make accommodations while building it. I feel like I should have done a better job at measuring so that I only needed to cut once.
With all that being said I think this turned out to be a success, and it was nice to have help from my classmates, Dr. Urbano, and Mr. Mitchell. I think I would love to do another project like this again with classmates where it involves building something, or some sort of system.
Physics and Graduation Presents
This quarter, I have been learning about physics during makerspace time and making a graduation present for my sister. I’ve learned kinematics, 1-D and 2-D motion, Newton’s Laws, circular motion and gravity, work, conservation of momentum and energy, collisions, torque, and rotational momentum. I plan on using that later to make some cool things in the makerspace, perhaps a functioning wooden model of the solar system or maybe some sort of computer program to calculate motion. For my sister’s present(shh, don’t tell), I’ve been trying out different designs for a placard with her graduation date, major, college and memento-y stuff like that. It has proven significantly more difficult than I thought because it’s really hard finding designs that are good, and images that have a high enough resolution. I’m also going to play around with material to see if it looks better on acrylic or wood. I’m also doing it double sided–which will bring more challenges when I get to that. I’ve mostly given up on my epoxy working because all of the polishing and sanding was very difficult and never turned out as well as expected, though I might try again in the future.
LED Anchor
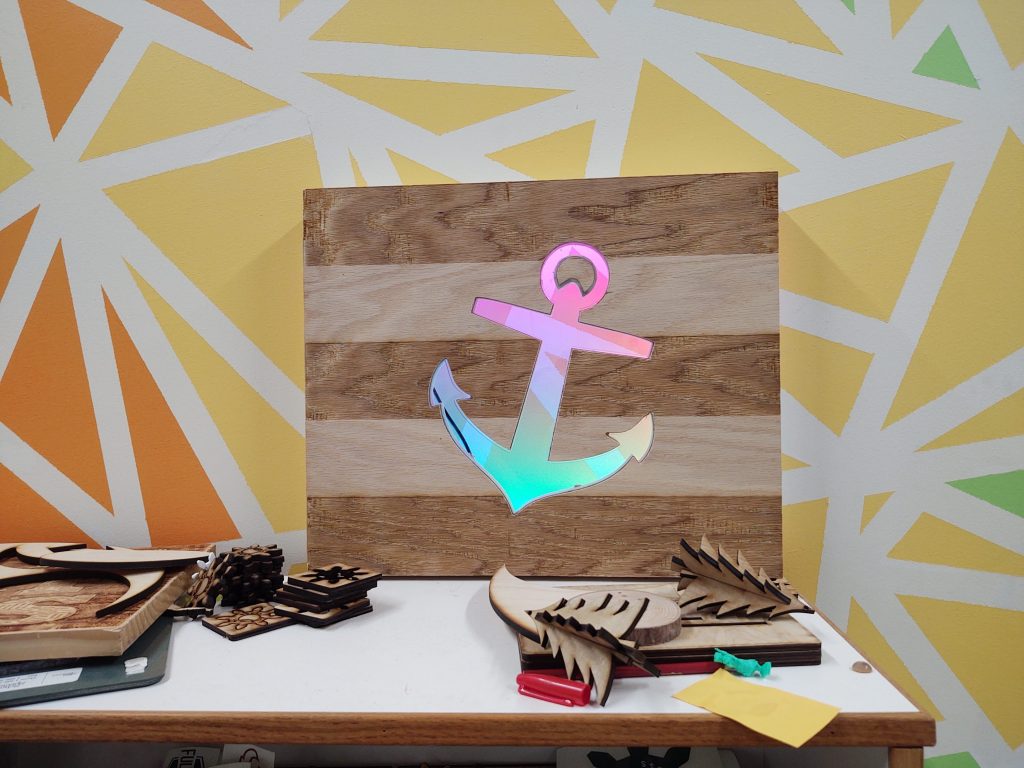
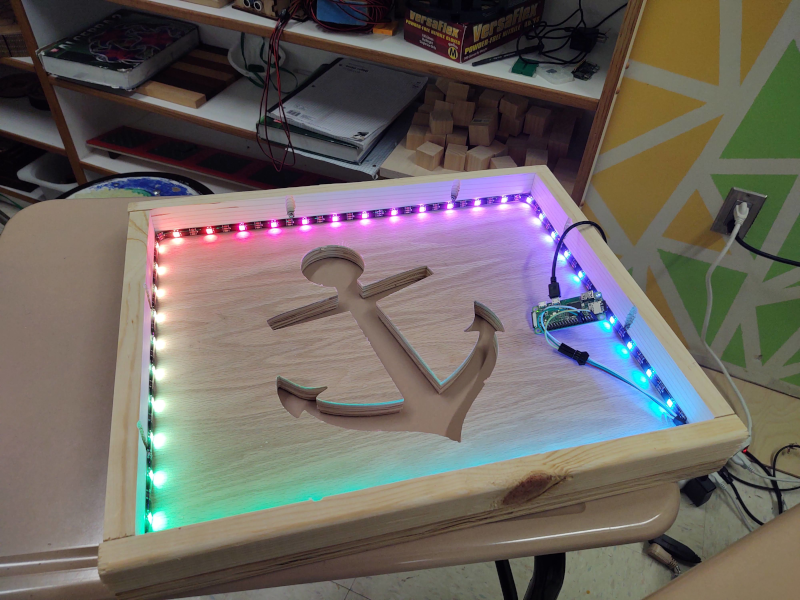
The original idea for this project was to just create a frame with a silhouette of an anchor that illuminated blue LED light when hung on a wall. Very quickly that idea progressed into programming a raspberry pi to run the LED lights with customizable features.
Creating the frame and wooden face turned out to be the quickest step in the process. By using the CNC machine and laser cutter, I was able to cut out the anchor and burn stripes into the wood. Making the back of the frame simply required finding four scrape pieces of wood that matched in size and color to nail together. Since the face of the frame is large enough, the scrape pieces of wood didn’t need to be specific in size, just long enough to be all placed on the back of the face and fitted together.
We came up with the idea to program the LED lights ourselves instead of buying strands that came with remotes. When we started out, we used a new chip to set up the raspberry pi and found instructions online to know what needed to be installed in order to make the raspberry pi compatible with the LED lights. We had about a two month trial and error period that eventually led to proper functioning of the lights, but when set up, using a terminal window was needed to connect and run the the commands.
Coincidentally, Dr. Urbano created a platform that can be accessed by a phone or computer by just typing in the IP address of the raspberry pi followed by -:8040 to access the control for the LED lights. This way, you don’t have to go through a terminal window to log in and command the raspberry pi manually. With this platform, I was able to transfer my project to my house (or any location) with an easy set up.
*Key note: The IP address changes depending on what wifi network you are connected to. To change the wifi address, just edit the SM card in the raspberry pi.
Github link: https://github.com/lurbano/rpi-led-strip
Racing Displays
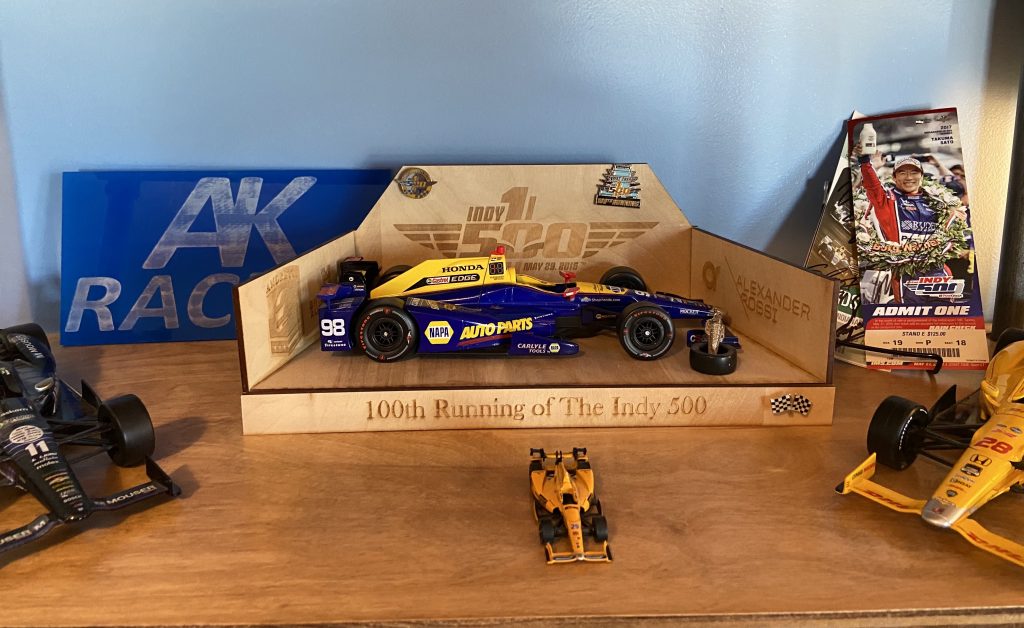
I have built many displays for different racing items I have. The first picture is a stand I built for the 100th Running of the Indy 500 winning car. I etched the logos on the back and sides with some pics on the back. In the back, you can see my racing logo etched into a piece of acrylic. The next picture is taken of my Formula 1 shelf. In the middle, it has a stand I built for my red bull diecast. I built it out of foam board and printed logos out for the sides and back. On each side, you can see some team’s logos and their cars. The 3rd picture is a model I made of a Formula 1 garage. On the side is a plaque I got signed by a 2 time World Champion. I built the garage to replicate the real garages as much as possible. The bottom is split into two for each form of the team and the top is open for suites. The last picture has some picture frames I made for 2 of my go-karting achievements.


Recent Comments